

X
Research source
- Begin creating a spreadsheet in Google Sheets by clicking Blank spreadsheet from the Sheets homepage. Add headers for your contact information and begin populating.
- Install the "Yet Another Mail Merge" add-on by navigating to Extensions > Add-ons > Get add-ons and typing "mail merge" into the search box.
- Write your email in Gmail, then find its subject line in the drop-down menu within the Yet Another Mail Merge extension to send a mass email to your contact list.
Creating a Spreadsheet of Contact Information

Navigate to https://docs.google.com using a web browser. You can use any web browser on PC or Mac. This is the web address to Google Docs.

Click ☰. It's the icon with three horizontal lines in the upper-left corner. This displays the menu.

Click Sheets. It's in the menu that flies out when you click the icon with three horizontal lines. It's next to an icon that resembles a green sheet of paper with a table on it. This opens Google Sheets.

Click Blank spreadsheet. It's the first square at the top of the page that has an icon that resembles a colorful plus (+) sign. This creates a new Google Spreadsheet document. If you already have a spreadsheet with contact information, you can open that instead and skip to the next step.

Create Headers for your contact information. Use the first row at the top of the spreadsheet to create headers for your contact information in each cell. Type First and Last in the first two cells create a column your contacts first and last names. Then type Email in a cell at the top of the spreadsheet to create a column for your contacts email addresses. You can also create headers for any other information you have, such as Phone number and Location or Address.

Enter your contact information below the appropriate headers. Type the contact's name in the columns below the "First" and "Last" header cells. Then type their email in the column below the "Email" header. Then add any other contact information you have in the columns below the appropriate headers. If you already have a mail merge extension, you can also import contact information by clicking Add-ons and then selecting Yet Another Mail Merge. Then, select "Import Contacts" and select "Google Contacts" or "Other CRMs." Select a contact group using the drop-down menu next to "Groups", and then click "Import Contacts."
Installing the "Yet Another Mail Merge" Add-on

Navigate to Extensions > Add-ons. It's in the menu bar at the top of the website.

Click Get add-ons. It's in the drop-down menu below "Add-ons". This will open a window you can use to search for and install add-ons.

Type Mail Merge in the search bar and press ↵ Enter. The search bar is in the upper-right corner of the window. This produces a list of Mail Merge add-ons.

Open "Yet Another Mail Merge". It's likely the first add-on listed. A free version of "Yet Another Mail Merge" allows you to send up to 50 emails per day. A personal plan costs $24 per year and allows you to send up to 400 emails per day. There are other mail merge add-ons you can install too. Try different ones to see which one you like best.

Select your primary Google account. When you add the add-on, it displays a list of Google accounts. Click the Google account you want to grant the add-on access to. Make sure it is the same Google account from which you plan to send your email(s). If you don't see the Google account you want to use, click Use another account and sign in with the email address and password associated with your Google account.

Scroll down and click Allow. It's the blue button at the bottom of the page in the window.
Creating an Email Template

Navigate to https://mail.google.com in a web browser. You can use any web browser on PC or Mac. This is the website for Gmail. If you aren't logged in, click your Gmail account, or click Use another account and sign in with the email address and password associated with your Gmail account.

Click Compose. It's in the upper-left corner of the Gmail website. It's the blue button with a pencil icon.

Leave the "Recipients" line blank. There is no need to enter anything in this line. This line will be filled in with the Yet Another Mail Merge add-on.

Type a subject. Use the "Subject" line to type a subject for the email you intend to send using the contacts from your spreadsheet.
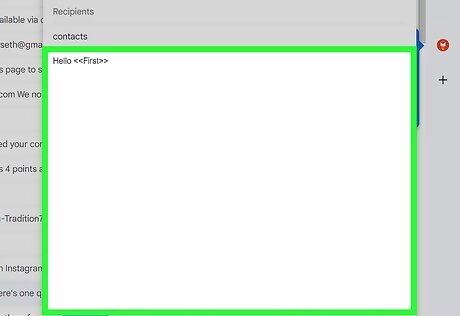
Type a message. Type the message you intend to send to your contacts in your spreadsheet. Gmail automatically saves your email as a draft every minute or so.
You can pull information from your spreadsheet by typing <
Using Yet Another Mail Merge to Create a Mailing List

Open the spreadsheet with your contact info. You likely have it open already.

Click Extensions. It's in the menu bar at the top of the web page.

Click Yet Another Mail Merge. It should be listed at the bottom of the drop-down menu. The extension will take a moment to open.

Type your name. Use the line next to "Sender Name" to type your name. If you manually signed your email template, this step is not entirely necessary. You also likely already have your name attached to your email address. Still, it is worth entering your name to be on the safe side and guarantee your mail merge is addressed appropriately.
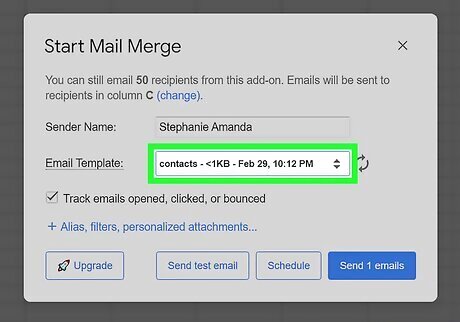
Select the email template you created. Click the drop-down menu next to "Email Template" and select the subject line that corresponds with the draft you created for your mail merge in Gmail.

Click Send # Emails. It's the blue button in the lower-right corner of the window. This sends an email to all the email addresses below your "Email" header using the email template you selected. You can view a tracking report on the right. The "#" in the "Send # Emails" displays the number of emails you will be sending. You can also select Schedule to send your mail merge at a later time or date. We recommending clicking Send test email to send yourself a test email before sending the email to everyone in your spreadsheet. This test email will pull info from the first line of your spreadsheet.


Comments
0 comment