
Checking the Voltage of an Outlet’s Sockets
Read the instructions that came with your multimeter before you use it. Even if you’ve used a multimeter before, the instructions of different models can vary and it’s important to read them to keep yourself safe. Read the instructions that came with your multimeter and check for specific information on how to safely test an outlet with the device. It’s especially important to make sure that the multimeter is capable of testing the voltage of the outlet. If the voltage is too high for the multimeter to measure, you may break it by trying to measure it.
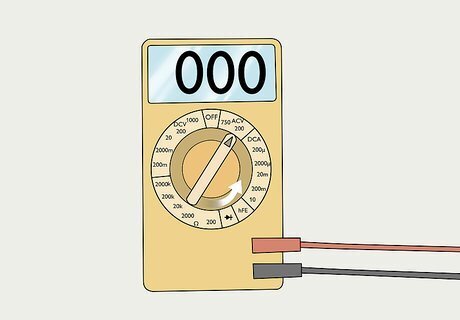
Turn on the multimeter and switch the dial to the AC setting. AC stands for alternating current and it is usually represented by an A with a squiggly line beside or above it, such as ~A or A~. Locate the power switch on the multimeter and switch it on. Then, turn the dial on the front of the multimeter to the AC setting. The dial may be clearly marked to indicate what the AC setting is, or you might need to check the manual if it uses symbols. Check your multimeter’s manual if you are unsure of how to turn it on.
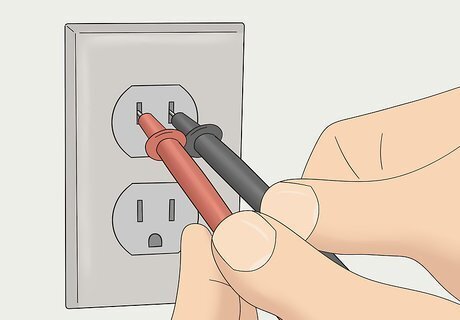
Insert 1 prong into the left side and 1 into the right side of the outlet. The multimeter should have 2 prongs, one red and one black. Insert 1 of them into the left side of the outlet and the other into the right side of the outlet. Even though the prongs are different colors, it doesn’t matter which one you put into each side of the outlet. The colors only matter for testing circuits and other types of electrical currents.Warning: Hold the prongs by the insulated parts only. Do not touch the metal parts or you may electrocute yourself!

Check the reading on the multimeter to determine the outlet’s voltage. Once the prongs are in place, look at the front of the multimeter. If it’s a digital multimeter, the number will be displayed clearly on the screen. If it’s an analog multimeter, look at where the needle is pointing to get the reading. A typical reading for a household outlet in the United States is 120 volts. However, if it’s lower or higher, the outlet may be malfunctioning. Pull the prongs out of the outlet and switch off the multimeter after you’re done checking the outlet. Mike Holt, Residential Wiring Specialist Testing outlets with a multimeter is a crucial safety step before any electrical work. Set the device to AC voltage mode and insert the leads correctly, with one prong in the hot slot and one in neutral. A normal reading is 110-120 volts. Abnormal readings indicate a wiring issue that must be addressed before proceeding, potentially preventing electrocution or fire.
Ensuring that the Casing is Grounded

Switch on the multimeter and turn the dial to the AC setting. AC stands for alternating current and this setting measures the volts that an outlet is putting out. Find the power switch on your multimeter and switch it on. Then, locate the dial on the front of the multimeter and turn it to the AC setting. The dial may be marked to indicate the AC setting, such as with an A followed by a squiggly line. Look at your multimeter’s instruction manual if you are not sure how to turn it on or select the AC setting.

Press the black prong against a screw or other metal part of the fixture. To ensure that no electricity is reaching the outside of your outlet, hold the black prong by the insulated part. Then, press the metal tip of the prong against a screw or another piece of metal on the outlet fixture. Do not touch the metal prong at any point while you’re doing this!
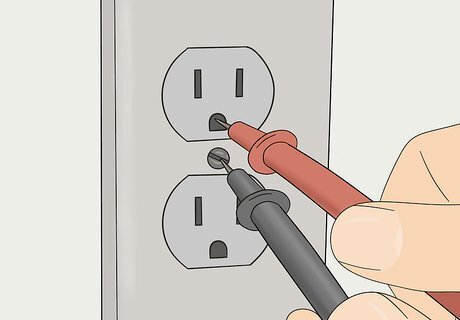
Insert the red prong into the bottom hole of the outlet. Next, hold the red prong by the insulated part and insert the metal prong into the bottom hole of the outlet. This hole is round with 1 flat edge. If the hole is grounded as it should be, no electricity should come out of it.Tip: If you want, you can also check the left side of the socket while pressing the black prong against a screw. No electricity should come out of the left slot of your socket either. Only the right side of the socket should have an electrical current.

Look for a reading of 0.001 on the multimeter screen. Once the red prong and the black prong are in place, look at the screen or analog dial on your multimeter. The reading should be 0 or 0.001 volts. This indicates that no electricity is reaching the outside of the outlet and it is well grounded. If the number is higher than this, the casing is a potential electrocution hazard. Call an electrician for assistance. Remove the prongs from the outlet and switch off the multimeter when you’re done.


Comments
0 comment