views
Changing the Settings on Your DSLR

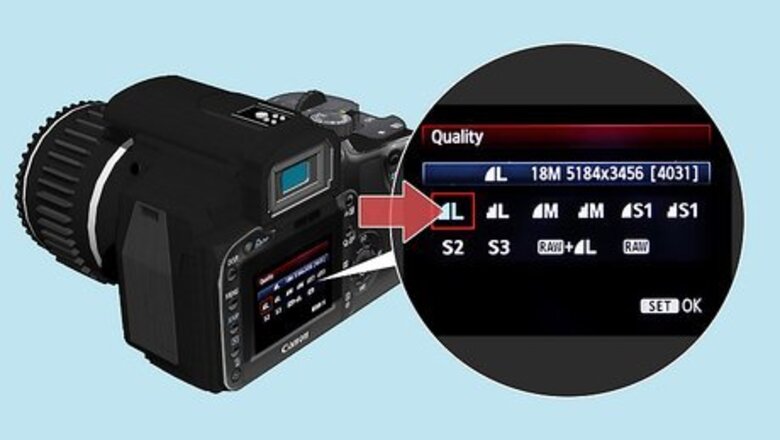
Set the resolution to the highest value in your camera’s settings. This setting should be in "quality" or “resolution” in your camera's menu. The vast majority of DSLR cameras won’t list the resolution in megapixels, which is what resolution actually measures. Rather, it will show a series of icons indicating different qualities/sizes. Always choose the largest size (or number) available. For instance, the icons may list "L," "M," "S1," "S2," and "S3," meaning "large," "medium," "small 1," "small 2, " and "small 3." If it lists the resolution by megapixels, you’ll just see a list of numbers. Know that the higher the number, the higher the resolution. You can always shoot in a high resolution and then change it to a lower resolution later when you edit. You can’t do the opposite, though. There’s no way to move a resolution up in editing, so always use the highest resolution setting available.

Opt for the curved icon over the stair-step icon for compression. If your camera’s resolution menu offers more than one version of each size, they’re different compression settings. Always choose the round setting over the angular one. Next to the letters or pixels designating the quality, the camera may have an icon indicating the compression level. The curved icon generally means better quality compression, giving you a higher resolution photo. If your camera doesn’t use the standard icons, it will say things like “fine,” “basic,” or “normal.” Choose “fine” or “superfine” if your camera doesn’t use the standard icons. Compression refers to how much information is lost when you take a photo. The less compression there is, the sharper the image will be. However, a lack of compression makes files extremely large. That’s something to keep in mind if you’re storing your photos on a smaller hard drive. Compression is technically not a resolution setting, but it contributes directly to the accuracy of the resolution, so it’s often tied to a resolution setting in your camera.

Shoot in RAW if you’re doing any editing to preserve image quality. While JPEG is the more popular file type when it comes to sharing and uploading images, your camera automatically drops a little quality if you shoot in JPEG. If you shoot in RAW (which is as accurate as an image can get), you can always digitally transfer to JPEG without losing the pixels at the beginning. If your camera doesn’t offer a RAW shooting mode, use JPEG instead of TIFF or whatever other formats are offered.
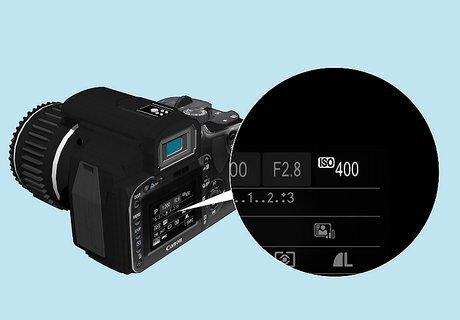
Use the lowest ISO available given your lighting. International Standards Organization (ISO) is a camera setting that determines your shutter’s sensitivity to light. When you raise the ISO, you’re increasing the clarity of the objects that make up the image, but at the expense of the texture and smoothness, which can look a lot like lowering the resolution. To maintain a high image quality and preserve your image’s resolution, choose the lowest ISO possible. The darker it is, the higher your ISO needs to be. In regular light conditions, you typically don’t need more than 100-400 ISO unless you’re shooting something in motion. ISO is one of the 3 big settings when it comes to the quality of your shots. The other 2 are aperture and shutter speed, which won’t impact resolution.
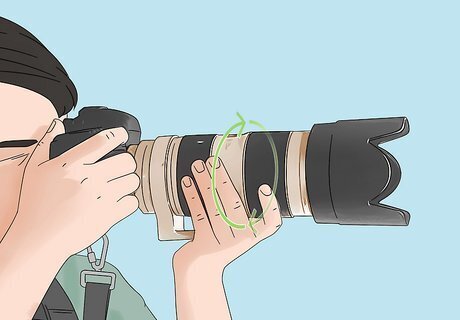
Zoom in with your lens, not in digital editing. Some photographers shoot as wide as possible and then crop or zoom later in editing. This artificially enlarges your pixels, thus lowering your resolution. If you need to get closer to your subject, use your lens. This way, you won’t lose out on any image quality when you pull the photo up in post. Remember, resolution is just the number of pixels. When you zoom in digitally, you’re zooming in on the pixels and making them bigger, thereby lowering the resolution.
Shooting High-Resolution Images on Your Phone

Assume your phone automatically shoots in high resolution. Unless you’ve got a really unique phone, your phone is most likely shooting in the highest resolution available. Most people out there are not photography experts who would know enough to even think about changing the resolution, so phone manufacturers design their product’s cameras to be easy to use for the average Jane or Joe.

Change your iPhone’s video resolution to be sharper. You cannot manually change the resolution for an iPhone’s photos (they’re automatically as high as they’ll go). You can change the moving image resolution, though! Go into the camera app and tap the little FPS (frames per second) icon in the corner of the viewfinder. From there, change the resolution of your video. Like a photograph’s resolution, bigger is always better here. 4K is about as good as it can get these days, and the newer iPhones can shoot it! If your phone doesn’t have 4K, shoot in 1080p if you want the highest resolution.
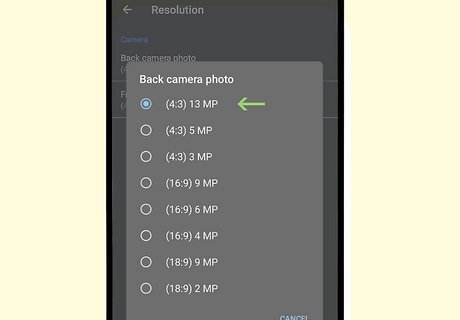
Adjust the photo size to change resolution on an Android. Some Android phones (if not most) allow you to adjust the resolution. Find the camera’s shooting modes menu, select the settings, and you’ll typically find settings for the resolution in this menu. Select the highest number available to shoot in the highest resolution. The photo size is often listed in a ratio. A 4:3 photo, for example, is 4 pixels long for every 3 pixels tall. Ignore the ratio and choose the highest overall number to get the highest resolution.

Set a focus point to maintain a clear, crisp image. On an iPhone, setting the focus point is as easy as tapping on the spot you want to focus on. The iPhone will create a yellow square around the spot. It's usually the same on Android phones, so just tap the point you want the camera to adjust to. The largest number (either 720p, 1080p, or 4k) will be the highest resolution. This has nothing to really do with resolution per se, but it does ensure that the integrity of the resolution remains accurate.
Combining Multiple Images to Increase Resolution

Set the camera's exposure and focus manually if you have a DSLR. If you let the camera auto-focus and set the exposure automatically, it will change between shots. That will lead to problems when you try to stitch the images together later. Line up one shot to set the focus and exposure, then keep it the same through all your shots. Use auto-ISO if you can, as it will adjust for you. Otherwise, pick the lowest ISO speed you can given the light you have available (100-400 is ideal if there’s light). For shutter speed, use one that's 1/(2x the length of your lens). For a 135-millimeter lens, you'd want 1/270. This is more difficult to do on a phone. However, if you use continuous burst mode, the camera will likely keep the same focus and exposure throughout the shots. Merging multiple photos is the only way to artificially increase the resolution so that it’s higher than what your camera is capable of.
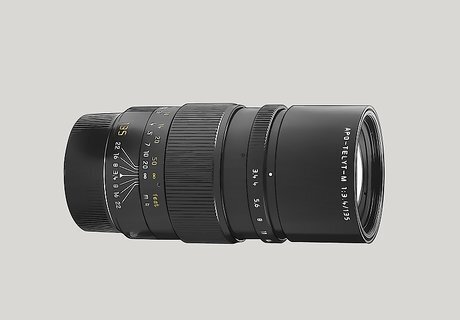
Use a longer lens to take a series of smaller shots. A longer lens, as opposed to a wide lens, limits the scope of the shot. That means you get more resolution for your image, as you're focusing on a smaller area. Aim for a lens that's 135 millimeters or longer if you want the highest quality image available. Similarly, turn your camera or phone so you're taking pictures in portrait. Width-wise, you're taking in less of the subject at a time, so it leads to higher resolution when you stitch the pictures together if you shoot in landscape. You can take a picture of pretty much anything using this setting, as long as it's fairly still. Since you're taking multiple shots, you can focus on a small area or take a wide landscape shot.

Take all of the photos when your subject is still. If the subject is moving at all, it will come across as a blur when you go to stitch the photos together. That includes things like plants moving in the breeze, cars driving by, and people walking. If you do catch some photos with people walking or cars moving, just leave those out of your group when you stitch the photos together.

Use the “continuous burst” mode to shoot the photos. Usually, you can just hold the shutter button down to get multiple shots in a quick burst. You may need to change the shooting mode to “burst” in your camera, though. Just holding the camera in your hand will be enough to get small shifts in perspective that will lead to a high resolution in the end product. If you don't have continuous burst, just take photos that overlap at least 50% as you move your camera over the subject.

Shoot 4-30 photos, depending on how high you want the resolution to be. Just stitching together 4 photos can increase the quality dramatically. However, for the best quality, aim for 20-30 photos of the same area that you can stack together, which will give you a lot more megapixels.

Import the photos into Photoshop. Click "File," "Script," and then "Load Files into Stack." Select the photos you want to layer together by browsing to the appropriate folder. Unclick the box marked "Attempt to Automatically Align Source Images," as that will keep this process from working properly. You can use any photo editing program that you’d like. Most editing programs can do this. It just so happens that Photoshop is considered the industry standard when it comes to photo editing.
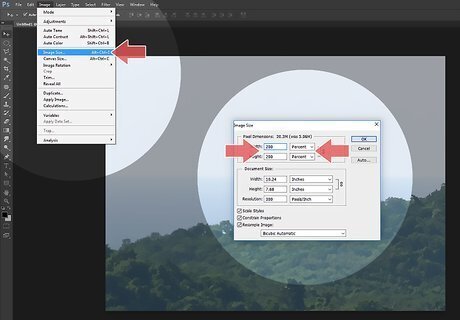
Resize all the photos to 200% height and width. Click on "Image" and then "Image Size." Type "200" in both the height and width boxes. Click the box next to "Resample," and then select "Nearest Neighbor." Leave the resolution where it is. You’re going to artificially increase the resolution, so lowering it now would defeat the purpose.

Use the layers palette to align the individual photos. Select all the photos by hitting "Shift" and clicking on each one or hitting "CTRL + A." Then, click "Edit" and "Auto-Align Layers." Select "Auto" under the projection setting, making sure "Geometric Distortion" and "Vignette Removal" are not checked. Hit "OK" to complete the process. If any photos look out of place in the layers, you can just delete them for a smoother photo.
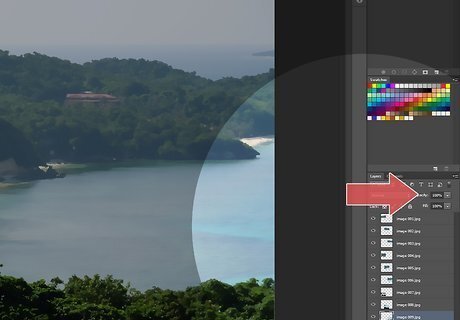
Average the layers individually with the opacity setting. Start with the bottom layer, setting it to 100%. As you move up through the layers, use this simple equation to determine the opacity: 1/the layer number. So, the first layer is 1/1 (100%), the next layer is 1/2 (50%), the next layer is 1/3 (33%), etc. Just round up to the nearest number. It doesn't matter if you end up with duplicate opacity percentages near the top, which will have much lower opacity percentages.

Sharpen the final image to make it as crisp as possible. Go to "Filter," then "Sharpen." Select "Smart Sharpen." Set the amount to 300% and the Radius to 2px. Opt to reduce noise by 0%, then click "OK" to let the program sharpen the photo.
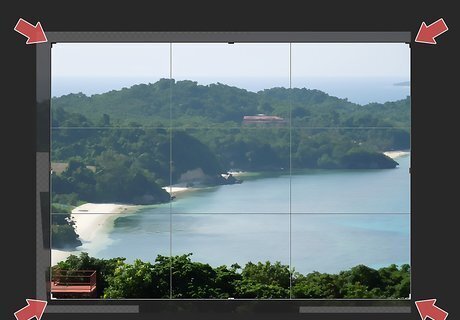
Crop the photo to remove uneven edges or elements you dislike. Select the crop tool and set it so it's almost to the edge on all sides. Hit the "OK" button to crop it, cleaning up any jagged areas on the sides of your photo. Don't forget to save your final image!








Comments
0 comment