

Creating Simple Coconut Chocolate Milk
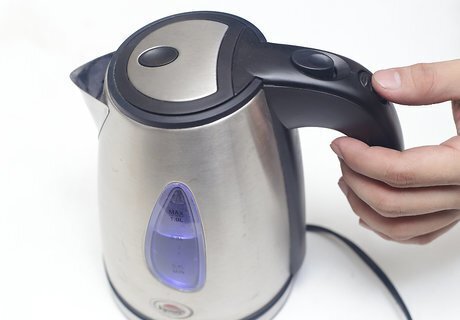
Heat your water. Heat your water until it is either very hot or boiling. You can do this easily by heating the water in a pot on your stovetop or in an electric kettle. Water that is slightly below boiling will better preserve the nutritional value of the coconut.

Prepare your strainer while the water heats. As your water is heating, take two pieces of cheesecloth and layer them inside your strainer. Be sure that both pieces cover the entire inside of the strainer. Then place the strainer over a large bowl.
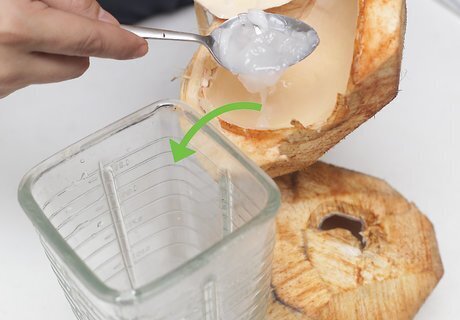
Blend your ingredients. Make sure your blender is unplugged to prevent it from accidentally activating and causing harm or creating a mess. Then add your shredded coconut and heated water to the blender. Attach the lid firmly and blend the mixture. It should only take about 45 seconds of blending before your mixture is ready to be strained.
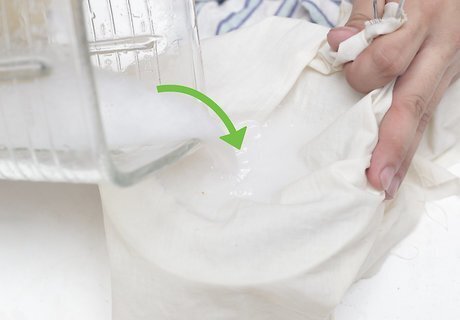
Strain your mixture. Pour your blended hot water and shredded coconut mixture into your strainer. Allow the liquid to drip into the bowl beneath the strainer. To get every last drop, gather the edges of the cheesecloth together and squeeze all remaining liquid from the shredded coconut. Wait about 10 minutes before squeezing leftover liquid from the cheesecloth. It may still be quite hot.
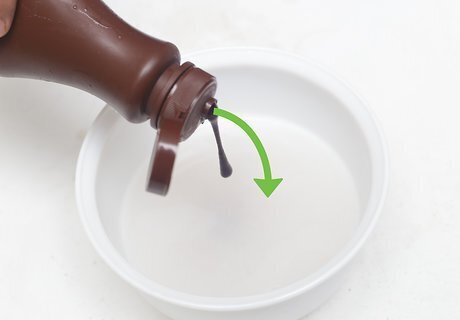
Add chocolate syrup to your coconut milk. Depending on the brand of syrup you are using, the amount you need to add to your milk will vary. You may like your chocolate milk sweet, or you might like it less so. Add syrup until you achieve the desired taste. Mix the liquid well with a spoon or similar suitable stirring implement to distribute the syrup throughout the milk. Otherwise, the syrup might collect on the bottom of the bowl.

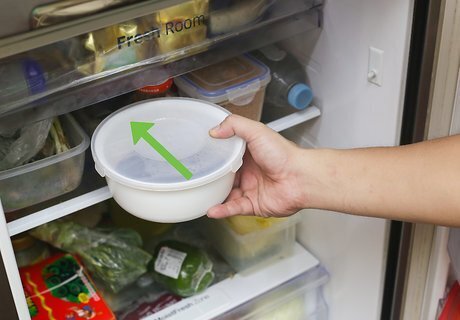
Refrigerate your coconut milk and enjoy. If you desire, you can transfer your simple coconut chocolate milk to a different container that might be more suitable for storage. However, feel free to put your bowl of coconut chocolate milk straight in the fridge. Once your coconut milk is done, you should drink it within two days to prevent it from going bad.
Whipping up Chocolate Syrup from Scratch

Prepare your coconut milk. In the fashion previously described, heat water, blend the heated water and shredded coconut, and strain it into a bowl. After that, you're ready to add your syrup ingredients to the mixture.

Whisk in your ingredients into the mixture. Put your salt, coconut palm sugar, cacao powder, vanilla, and sunflower lecithin into your coconut milk. Whisk these ingredients until the mixture is consistent throughout. You can substitute maple syrup (¼ cup or more, depending on your taste) for the coconut palm sugar.
Refrigerate your coconut chocolate milk and enjoy. A sealable container with a pour spout or nozzle works well for storage. Before serving the milk, give the container a shake while the lid is closed. Shaking the container before serving will stir up any ingredients that may have settled to the bottom.
Making Coconut Chocolate Milk Ice Cream

Blend your ingredients together. Before adding ingredients, make sure your blender is unplugged. When the lid is firmly in place, blend the ingredients until they are creamy and well mixed throughout. If you don't have a blender, you should be able to do this with a whisk as well, though it may take more time and some extra effort on your part.

Transfer your ingredients. Choose a freezer safe container and pour your blended mixture into it. Keep the mixture in your freezer for about 4 to 6 hours, or until it has become firm. To prevent some of the mixture from accidentally spilling in your freezer, you may want to cover it with a lid or plastic wrap. For a quicker preparation time, you can use an ice cream maker. These generally freeze your ice cream in roughly 20 minutes.

Thaw hardened ice cream before serving. Depending on the temperature of your freezer and where you've placed the ice cream in it, the ice cream may have hardened too much. In this situation, set the ice cream out to thaw for 15 to 20 minutes before you serve it.


Comments
0 comment