
Setting Up
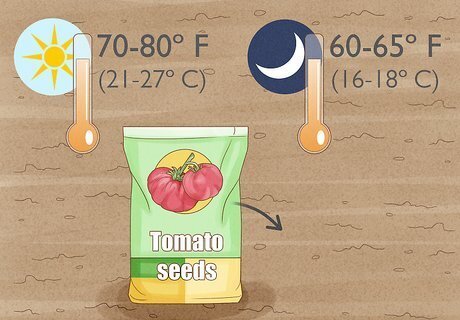
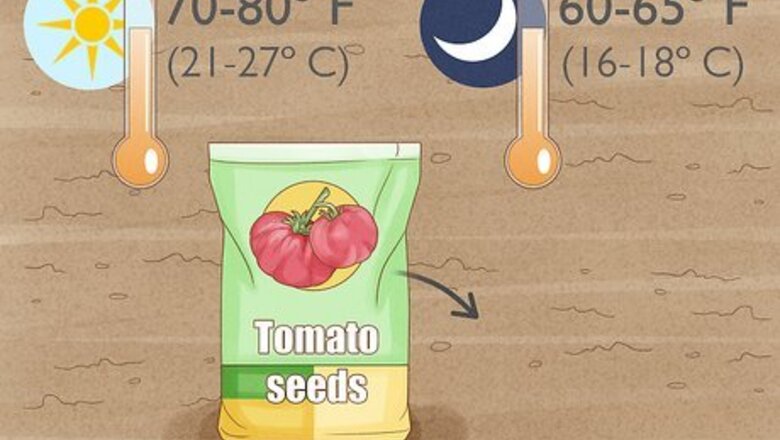
Check temperature. Tomatoes grow best at daytime temperatures of 70 to 80º F (21–27º C), and nighttime temperatures of 60–65º F (16–18º C). Make sure you can maintain these temperatures in your greenhouse for several months before you plant. Ideally, bring temperatures to the lower end of this range on overcast days, and raise them to the upper end (or even slightly higher) during clear, sunny days. You'll also need to keep humidity below 90% to prevent excessive leaf mold. Ventilate regularly to bring fresh, dry air into the greenhouse, especially on cool, cloudy mornings.
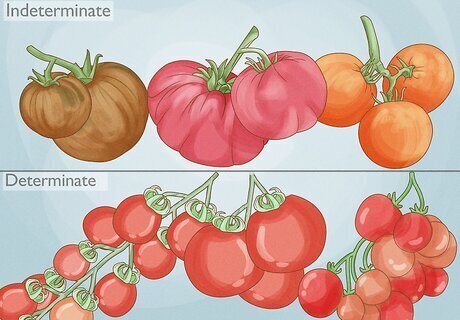
Select a tomato variety. There are thousands of tomato varieties, so for detailed information it's best to talk to local growers. There are a few guidelines and tips that apply to all regions, however: Tomatoes marketed as greenhouse varieties are more tolerant of greenhouse conditions. The letters VFNT and A after the name mean the variety is resistant to disease. "Indeterminate" tomatoes grow and produce fruit indefinitely, taking advantage of the longer growing season inside a greenhouse. If you're short on space, plant a "determinate" variety, which stops at a certain height.
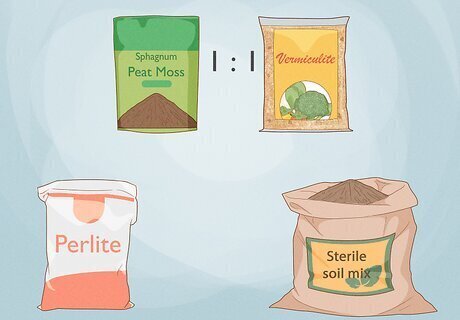
Choose a growing medium. Tomatoes can grow in any well-draining material. You can use your preferred soil-less mix, or one of these options: Perlite bags or rock wool slabs are the cheapest options in many areas. Some growers prefer a 1:1 mix of sphagnum peat moss and vermiculite. Purchase sterile soil mix or make your own. Never use soil or compost from your garden without sterilizing. Choose this option if you do not want to install an irrigation system.

Install an irrigation system (recommended). Most growers install drip tubing to deliver water to each plant. A fertilizer injector attached to the tubing can automate fertilizing as well. Tomatoes are also easy to grow in a hydroponics system. See this article for detailed instructions.
Planting
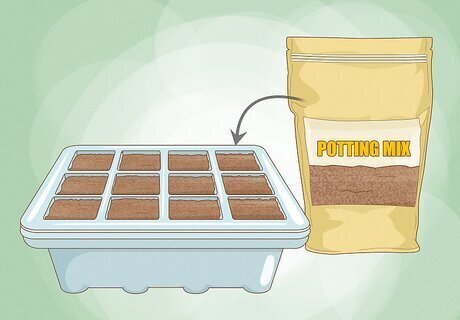
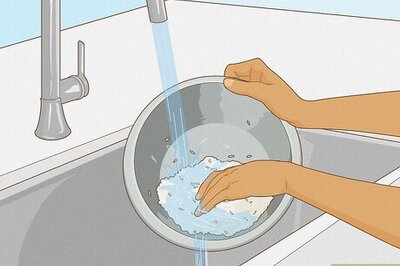
Fill a starting tray with potting mix. Wash the tray thoroughly with soap and water to disinfect it. Fill the tray with any of the potting mixes described above. If you use soil, make sure it is sterile. If you use a soil-less mix, you'll also need a seedling nutrient solution (see below).
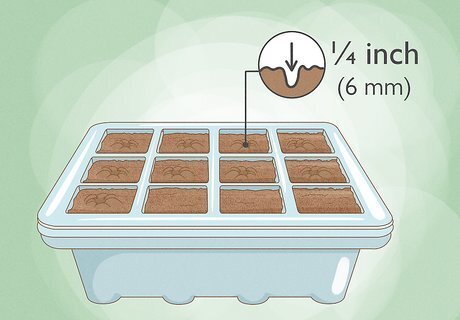
Plant each seed in its own cup. Poke a ¼ inch (6 mm) hole into each compartment of the starting tray. Drop a single seed into each hole. Cover lightly with the potting mix. Plant about 10-15% more seeds than you plan on growing, so you can discard the least healthy seedlings.
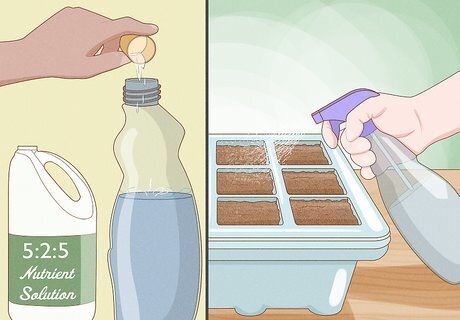
Moisten with water or dilute nutrient solution. Use plain water for soil, or seedling nutrient solution for soil-less mixes. Either way, water until the mixture is just damp enough to press into a clump, with only a few drops squeezed out. Water regularly to keep the mix damp. A 5:2:5 nutrient solution that contains calcium and magnesium is ideal. Dilute the solution according to label instructions.
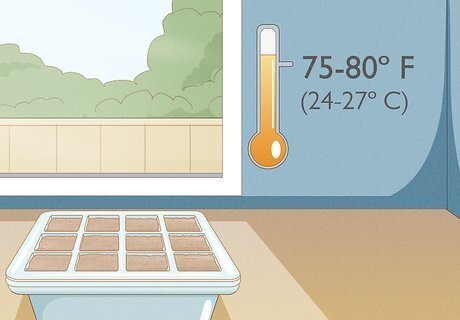
Keep the tray on a warm windowsill. Do not bring the seeds into the greenhouse until they've sprouted, so you can check for disease and pests. Provide plenty of sunlight and keep the temperature at 75–80º F (24–27º C) during the day. To keep temperatures under control, you may want to start the tray in partial sun. Move to full sun once all seedlings have sprouted. This usually takes 5 to 12 days.
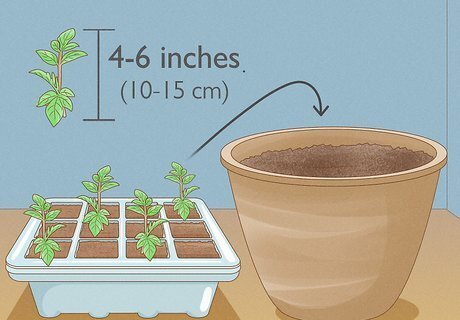
Transplant to larger containers. Transplant the seedlings to small pots in the greenhouse about two weeks after they emerge. After six to eight weeks, or once seedlings are 4-6 inches (10–15 cm) tall, transplant them to larger pots or bags. A typical plant needs roughly ½ to 1 cubic foot of potting material (3.7–7.5 gallons, or 14–28 liters). Even smaller varieties may produce less fruit if grown in smaller pots. If you see any insects, mold, or disease spots on a plant, do not bring any of them to the greenhouse. Give each plant about 4 square feet (0.37 m) of floor space. Planting too close together can reduce airflow and encourage disease.
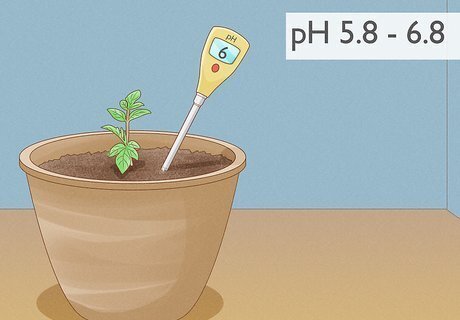
Adjust pH and calcium levels. Before the final transplant, you may want to check soil pH, which ideally falls between 5.8 and 6.8. If your soil is too acidic, add about 1 tsp (5 mL) hydrated lime for each gallon (3.8 L) of potting mix. Besides raising the pH, this adds calcium that can prevent blossom rot later on. If your pH is fine, mix in gypsum or calcium sulfate instead to add calcium without changing the pH. Alternatively, just choose a fertilizer that contains calcium and apply every week or two. In a hydroponics setup, you can supply calcium by injecting calcium nitrate into the irrigation feed. This requires a second injector, as calcium nitrate cannot be stored with your main fertilizer.
Caring for the Plants

Fertilize regularly. Start fertilizing the day you transplant the tomatoes into their final pot. Use a complete fertilizer high in nitrogen (N) and potassium (K), such as a 15-5-15 or 5-2-5. Dilute and apply the fertilizer according to label instructions. Reduce fertilizer as the final fruits ripen. Do not fertilize in late autumn or winter, unless using artificial grow lights and reliable heaters.
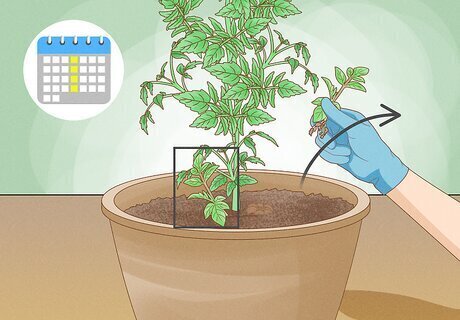
Remove suckers weekly. Once a week, pinch off "suckers," or side shoots that emerge where a leaf meets the main stem. Leave only the main bud at the top of the steam, plus the highest sucker below it. This trains the plant to grow upward instead of wide. If the top of your plant is damaged, the top sucker can become the new main stem.

Stake the tomato plants. Tie the plants loosely to stakes with twine to keep them upright as they grow. Use plastic garden clips where necessary to secure the twine. In peak growing season, the plant will grow up to 6 in (15 cm) per week and will need tying each week. Commercial operations save on materials by stringing a wire over each row, with a support post every 20 ft (6m). Wrap the twine around each plant and fasten to the overhead wire. For smaller home gardens, you can place a tomato cage over each plant when it is small. These don't require as much maintenance as staking.
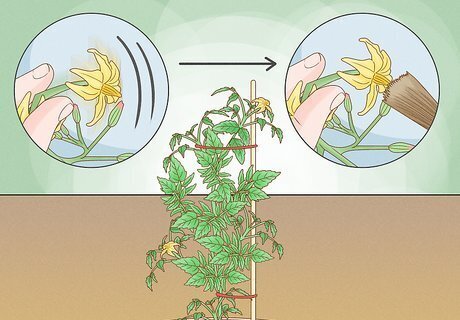
Pollinate the flowers. Unlike many plants, a tomato can pollinate itself — but it needs some help. The pollen in a tomato flower is trapped inside a tube, and must be released through vibration. Since most greenhouses lack bees or high wind, you'll need to act as the pollinator once flowers are fully open: For best results, buy an electric plant vibrator. Touch the vibrator against each flower stalk every other day, at any time between 10am and 2pm. (An electric toothbrush is another, less effective option.) Alternatively, you can place fans in the greenhouse and direct the airflow over your plants to distribute the pollen. Large operations should consider keeping their own bees. Hand out cotton swabs to your children or family members and have them rub the cotton swabs in the flowers to distribute pollen.

Prune leaves and fruit. Apart from weekly sucker removal, pruning is not necessary until the plant starts to fruit: Once fruit starts to grow, thin each cluster down to four or five fruits, removing the smallest or most misshapen. Very large fruits or winter conditions may require going down to three per cluster. Varieties with small fruits may not need any thinning. As the fruit matures, snap off older leaves from the lower clusters. This helps improve air circulation.
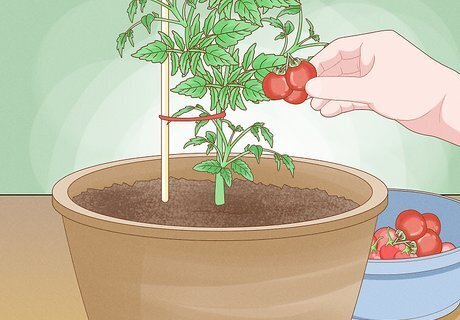
Harvest as late as possible. The longer the tomatoes stay on the vine, the fuller and redder they become. Commercial growers typically pick a little early, when the fruit is 60–90% red, to allow for time in shipping.


Comments
0 comment