
When practicing your presentation start by completing each step slowly and deliberately. Once you can do each step separately and perfectly then, and only then, try to make the steps three through five more fluid. Once you are able to do steps 3 - 5 smoothly and perfectly, you will find you are able to do it much more quickly.
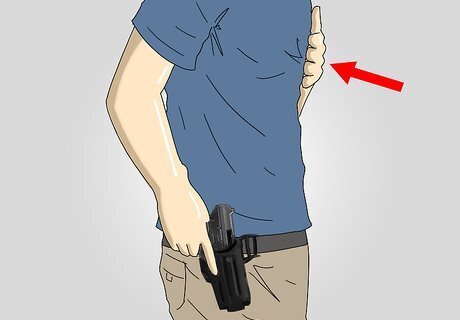
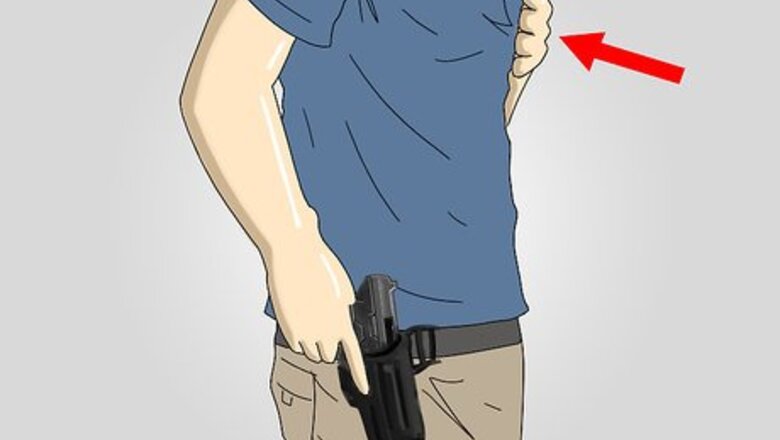
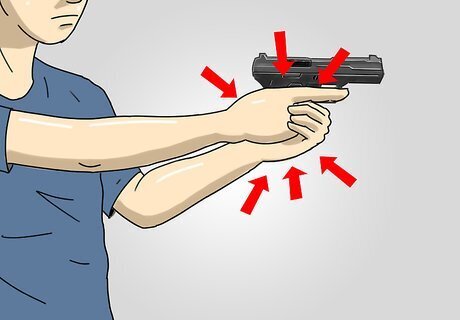
Both hands should perform their maneuvers simultaneously. Pull your support hand to your body (touching your upper chest is a great place). Your firing hand moves up above your pistol grip and back down on it to get a good firing grip on the gun (while in the holster). A good firing grip consist of the hand being high on the grip. The web of your hand between your thumb and index finger should be as high as possible into the tang of the pistol. Your index (pointing) finger should be straight and resting on the side of the holster (see photo). Never put your finger on the trigger before drawing, as this is how negligent discharges happen. Release any active-retention system you may have. This is one of the most important steps to complete the presentation quickly. You should practice bursting (all of a sudden) into this position.Do a Tactical Quickdraw With a Pistol Step 1Bullet1.jpg If you get a poor grip the gun now, it will be hard to adjust as you draw the weapon, and will cause your shots to be inaccurate. This position is easy to practice many times (and should be practiced the most) as it is a short and quick motion. Be sure to emphasize a perfect firing grip on the gun (all fingers around the grip —stock— and trigger finger on the index point).
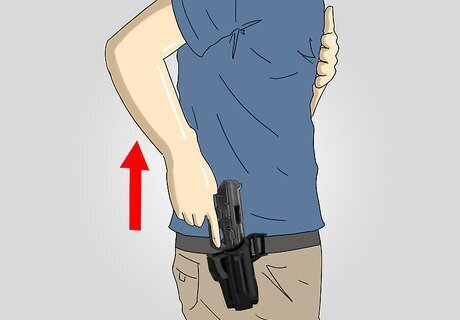
Your wrist should be as straight as possible. It should not be canted either left, right, forward or backwards. Pull the pistol straight up remembering to keep your wrist in the straight position. If more elevation of the pistol is needed to clear the holster, rotating your arm at the shoulder in an upwards and backwards motion should clear the pistol of the holster. (for passive-retention holsters, a straight, firm jerk is required) The pistol should be clear of any obstructions (to the front) created by the holster, but depending on the holster it may still be very near the holster (for example, the holster in the image has an open front so lifting above the holster is not required, just lift it to the opening).Do a Tactical Quickdraw With a Pistol Step 2Bullet1.jpg

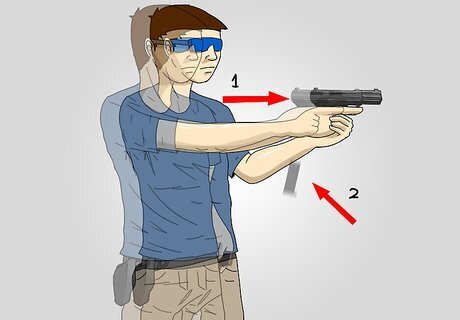
Remembering to keep your wrist straight or in line with your forearm, rotate your arm at the shoulder down and forward. This gets the pistol pointed down range at your target. If your pistol has an external safety, you should disengage it simultaneously as you are rotating you arm forward. From this position you are able to shoot a very close target (if necessary). Do not consider shooting from this position if the target is further than five feet (an arm-and-a-half away). For these reasons, this position is called "close-contact firing position" or "firing from retention".Do a Tactical Quickdraw With a Pistol Step 3Bullet1.jpg This is not a position that most gun ranges would likely enjoy you shooting from, so you may have to just dry-practice this position, or at a less-official range (see Tips). The key when practicing moving from position two to position three is to keep your wrist straight/in line with your forearm and rotating at the shoulder.Do a Tactical Quickdraw With a Pistol Step 3Bullet3.jpg

Remembering to keep the gun pointed towards the threat, move your gun toward your support hand at the upper chest and stop the gun underneath your dominant/shooting eye. While you are moving the gun, your support hand should be preparing to receive the gun. It should also move and meet the gun underneath the dominant eye. The support hand should wrap around the front of the grip and the side, enclosing the entire grip. You want to keep the muzzle level (parallel to the ground — for dry-practice — or pointed at your target) this way as you look at your target and your gun comes into view you can start to line up your sights in the split seconds as the gun moves. Having a friend watch your during your transition from position three to position five is very handy. The friend can tell you if you are "bowling" (dipping your muzzle low) or arching (throwing your muzzle high). Either one of those is less efficient and does not allow you to line up your sights whilst extending your arms toward the target.Do a Tactical Quickdraw With a Pistol Step 4Bullet2.jpg
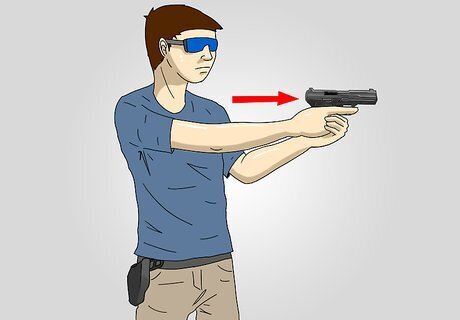
Complete the motion, keep your shoulders squared to the threat (face the threat), extend both arm straight out. Bending of one of the arms is not recommended. Putting pressure on the gun and bending one arm causes a natural tendency for your body to twist causing your shots to be off. It can be overcome over time but is not recommended. At the range a very straight firing arm is a good way to keep your sights at tight as possible, but in a tactical situation it usually is not best to keep fully extended because you increase your visual size.Do a Tactical Quickdraw With a Pistol Step 5Bullet1.jpg Practice just extending it about two-thirds of the way, or even half. It will take some getting used to as the gun is much closer to your face than you are used to, but the smaller profile is much better for close quarters tactics.Do a Tactical Quickdraw With a Pistol Step 5Bullet2.jpg Just before the gun is to its final position you should quickly focus directly, and only, on your front sight. Sight alignment should come shortly after (for more information on sight alignment, sight picture, and flash sighting please read the Tactically Prepare Yourself With a Pistol article.Do a Tactical Quickdraw With a Pistol Step 5Bullet3.jpg
Create "isometric pressure" once in the firing position. This is a stabilizing pressure that helps immensely for follow up shots, primarily, but helps retention and other things as well. Isometric pressure is made by pulling back with your support hand while pushing forward with your firing hand. This is a strenuous position, but highly beneficial. Practicing this every time you are at the range will help your shooting, and will give yourself procedural memory that will be used in any extreme situation. This pressure which is being created should be somewhat tiring the first few times you try it. Especially when your firing arm is not fully extended. The firing hand grip can be loosened (for increased accuracy) while more pressure is built-up by the support arm.
Performing a tactical reload before you re-holster (only after the fight seems to be done) is an excellent tactical choice and habit to get into. Not only are you sure you have encountered a lull in the fight (as nothing is immediately a threat), but if something were to happen while you are re-holstering, or after you have holstered, you have a full magazine (+1 in the chamber) to retaliate against an aftershock which may occur.
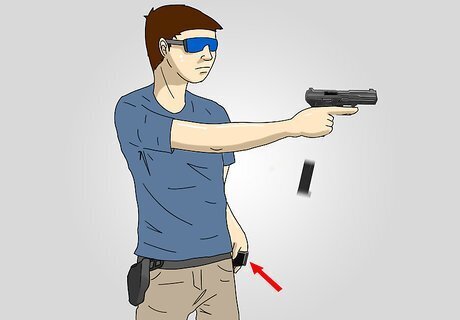
Re-holster in the exact opposite order of above. Pull back to close contact position 3, place your hand on your stomach. At this point it may behoove you to pause. In a combat situation, the fight which you think is done may spring up again. Take one last quick look around. Then safety on, rotate your wrist and raise your elbow, push gun straight down into holster and secure. Unless you are a law enforcement officer, there should be no rush to re-holster your weapon, so these last two steps you can take slowly and make sure your pistol slides in your holster smoothly.Do a Tactical Quickdraw With a Pistol Step 8Bullet2.jpg Be sure to maintain a full firing-grip on your pistol until you have completely secured the pistol in the holster (again, this allows for a quick response to any surprises which may arise).Do a Tactical Quickdraw With a Pistol Step 8Bullet3.jpg
Practice (perfectly, start slow!) drawing about 500 to 1000 times (no joke — that is about how long it takes for the process to become procedural muscle memory) and soon you will find you can draw extremely fast. Dry-practice (with an unloaded gun — see Warnings below) is the best way to get the motions ingrained into your muscle memory without any additional cost. Practicing for about 20 minutes every day for a week will surprise you how fast you can become. You can use empty magazines and training ammunition that is dummy rounds. Also practice holstering and do reload drills.
Try drawing and shooting a target at the range once you have the presentation perfected. Remember steps three through five should be smooth and level, try focusing on your front sight sooner until you are able to be flash sighted before your gun is in its final position. This is how you become a quick shot from the holster.


Comments
0 comment