
Planting Basics
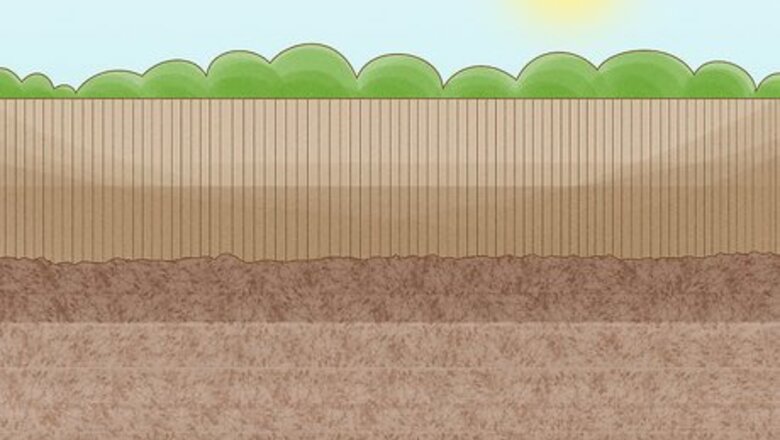
Pick a sunny spot. Chestnut trees grow best when grown in direct sunlight. For best results, choose a location that receives six or more hours of direct sunlight each days during the growing season. If possible, consider planting the tree at the top of a slight slope, as well. Doing so can help drain excess water and prevent the roots from getting soggy. Never plant chestnuts at the bottom of a slope.
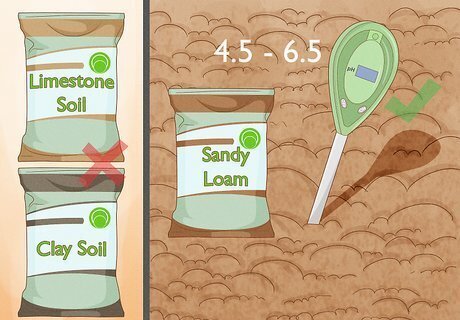
Pay attention to soil quality. The best soil for chestnut trees be well-draining and slightly acidic. Chestnut trees thrive in deep, sandy loam soils. Soils that contain rocks and gravel are also acceptable. Avoid heavy clay soils. The only way a chestnut tree can survive in a clay soil is if it is planted at the top of a downward slope. Ideally, the soil should have a pH between 4.5 and 6.5. Avoid limestone soils, since the pH is often too alkaline for a chestnut tree to survive.

Give the tree plenty of space. Make sure that each chestnut tree you plant has 40 feet (12.2 m) of free soil space in all directions to allow for adequate growing room. If you want to rush large harvests of chestnuts, you can plant multiple chestnut trees at half that distance, roughly 20 feet (6 m) apart, so that they start to crowd each other out and pollinate quicker.

Plant at least two trees. A single chestnut tree on its own will never produce any chestnuts. If you want the tree to produce nuts, there needs to be a second tree within 200 feet (60 m). Plant two different chestnut varieties to promote cross-pollination. Check around with your neighbors. If a next-door neighbor has a chestnut tree growing in their yard, that might be sufficient for yours.
Starting from Seed
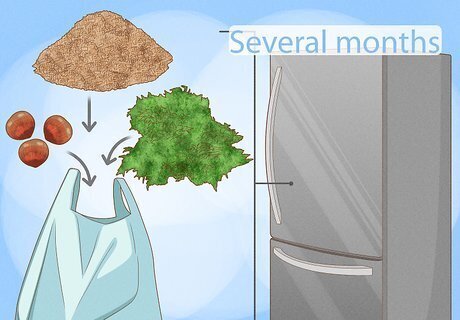
Chill the seeds. Place the seed nut in a plastic bag packed with damp sphagnum moss, peat moss, or sawdust. Seal the bag, then place it in your refrigerator for several months. Chestnut seeds are actually just normal, untreated chestnuts. Seed nuts need to undergo a period of chilling to germinate properly. Storing them in the refrigerator mimics the natural process while protecting them against the harsh freezes and animals found outdoors. For best results, place the chestnuts in a vegetable crisper to prevent them from accidentally freezing. The chestnuts should be stored in the refrigerator for several months, from harvest to planting.
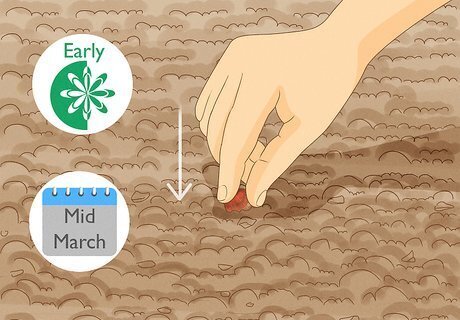
Plant outdoors in the spring. Once the weather has warmed, you can directly sow the chilled seed nuts outdoors. The best time to plant is early spring, usually around mid-March. You can sow the seed as soon as the soil is soft and warm enough to work in.

Alternatively, plant them indoors early. Chestnuts usually begin to develop roots in early to mid February. If you want to give the tree a head start, you can plant the seed early indoors once these roots poke through. Poke a few drainage holes in the bottom of a half-gallon (2 L) cardboard milk carton. Cut the top off the carton, as well. Fill the carton with soil-free potting mix. The ideal growing medium should contain large quantities of organic fibrous material. Mixes that contain composted bark are especially good. After planting the seed, place the container in a sunny windowsill. Water the potting medium when it feels dry. A sturdy seedling should grow from the nut within two or three months. Note that seeds germinated indoors should be treated as seedlings and, as such, transplanted outdoors during the spring according to the guidelines marked in the "Starting from Seedlings" section.

Place the seed in a fairly shallow hole. Dig a hole roughly 1 inch (2.5 cm) deep. Place the chestnut seed in the hole and cover loosely with additional soil or planting mix. Since most chestnuts will have sprouted before you plant them, make sure that the sprout is face-down when you plant the nut. If the seed has not sprouted yet, place it in the soil with the flat side of the seed facing downward.
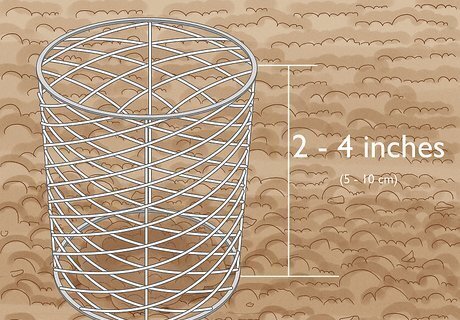
Protect the seed from animals. After planting the seed outdoors, cover the area above it with a wire screen or basket. Doing so will protect the seed from most rodents. Make sure that the top of the wire cage extends above the ground 2 to 4 inches (5 to 10 cm). This will give the seedling a chance to grow and establish itself before the screen has to be removed. Note that you do not need to cover the seed if you are starting it indoors.
Starting from Seedlings

Dig a deep enough hole. The hole should be deep enough so that the established roots can fit inside without being folded. The hole should be at least two times as large as the root ball of the seedling you want to plant. It is also recommended that you aerate the sides of the planting hole with a rake, garden fork, hand-held cultivator, or hand-held plow before placing the root ball inside.

Twist off the old shell. Carefully remove the seedling from its container and find the old nutshell clinging to the roots. Use your fingers to gently twist or break it off without damaging the roots. Many animals will be attracted to the scent of the nutshell and may dig up you seedling trees looking for that shell. Removing the shell makes your tree less of a target.
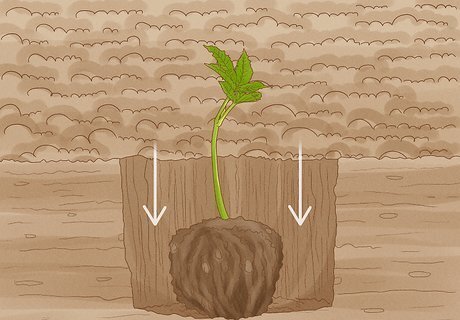
Place the root ball in the hole. Center the root ball of the seedling inside the hole. Backfill the hole with garden soil or planting mix until the tree is secure and no longer able to move around. Pack the soil in with your hands and feet to further secure the tree. Water the soil well after you plant the tree. Water helps the soil settle and removes any air pockets that were otherwise trapped inside the packed growing medium.

Protect the seedling. Protect seedlings from rodents by surrounding them with 1/4-inch (6-mm) hard-ward cloth. Sink the hardware cloth 2 to 4 inches (4 to 10 cm) into the ground. Keep at least 18 inches (46 cm) above the ground. If deer are a problem, this cylinder of hardware cloth may need to extend as high as 4 to 5 feet (1.2 to 1.5 m).
Caring for the Tree
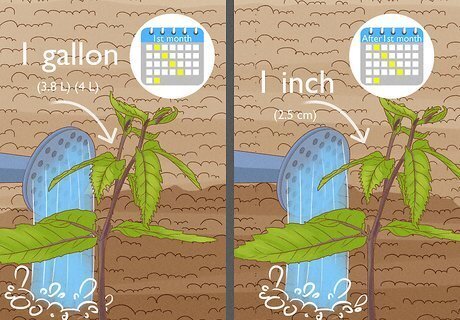
Water regularly. During its first month or two, the chestnut tree will need 1 gallon (3.8 L) (4 L) of water each week. After the first month or two, you should still make sure that the tree receives 1 inch (2.5 cm) of water each week during the growing season. You do not need to water the tree when it loses its leaves and becomes dormant.

Keep the weeds under control. Weeds and grasses should be kept at least 2 feet (0.61 m) (61 cm) away from new seedlings. For established trees, keep the ground bare all the way out to the ends of the tree's branches. The best way to do this is by applying organic mulch around the tree. Mulch also helps the soil retain moisture. An herbicide can be used to get rid of weeds, as well, but you need to protect the trunk of the tree before you apply an herbicide to the area.

Fertilize during the second year. You can apply fertilizer to the tree on a yearly basis starting its second year outdoors. Do not fertilize the seedling when you plant it. Doing so will encourage leaf production, but the tree needs to focus its efforts on root production during this time. Use a standard fertilizer containing balanced amounts of nitrogen, phosphorus, and potassium (usually labeled as 10-10-10 fertilizer).

Train the branches. During the tree's first two or three years, you should train it to follow a modified central leader form. Pick a sturdy central, upright stem. This will be the tree's central leader. Pinch back, bend down, or cut off any other stems that compete with your chosen leader. Major scaffold limbs growing off your main stem should be spaced 1 foot (0.30 m) (30.5 cm) apart along the central leader, growing in a spiral rotation. After the tree establishes itself, trim the limbs so that the lowest still gives you enough room to mow under the tree. When the central leader reaches 6 to 8 feet (1.8 to 2.4 m) high, cut it down so that it is as short as a side branch. This will allow the tree to grow wider instead of higher.

Watch out for chestnut blight. Chestnut blight is the only major disease you will need to worry about, but it can present a significant threat. The fungus gathers around the trunk of the tree, fixating mostly on areas that are cracked or wounded. It eventually develops into a large canker. When the canker wraps all the way around the tree, the tree itself will die. You will need to completely remove the tree and plant any future chestnut trees in a different location. Chestnut blight is almost impossible to treat once it infects a tree, even if you use a strong fungicide. Prevention is your best option. Plant blight-resistant chestnut tree varieties and make sure that the roots are never allowed to sit in soggy, overly-wet conditions.

Protect the tree against insect pests, as well. There are several different insect pests that may attack your tree, but the biggest problem is usually the chestnut weevil. Adult weevils lay eggs in developing nuts. When the eggs hatch, the larvae consumes the meat inside of the nut. Get rid of the weevils before they become a problem by spraying the tree with an insecticide once nut burs begin to develop. Alternatively, you can lay a sheet beneath the tree and give the branches a sturdy shake. Most of the weevils should fall off. You can then collect them in the sheet and dispose of it. You need to kill the adult weevils before they can lay eggs. There is no way to remove the pests once they find their way into the nuts.
Harvesting Chestnuts

Give the tree plenty of time. Chestnut trees don't produce any nuts during their first few years. If there is at least one other chestnut tree nearby and the trees remain healthy during these years, they should eventually produce nuts. Chinese chestnut trees usually produce nuts after five years. American chestnut trees usually produce nuts after eight years.
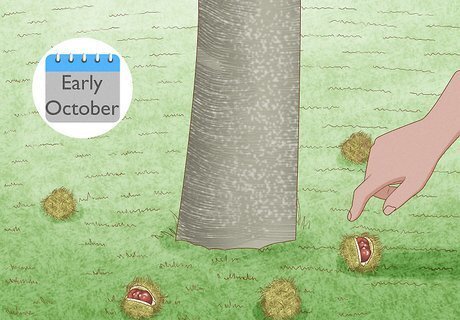
Collect the nuts as they drop. Chestnuts usually ripen around early October and drop off the burs they grow on once the weather cools. You can usually harvest the nuts by simply collecting them off the ground as they fall. If animals tend to grab the fallen nuts before you can, another option is to cut off the burs before the nuts drop. Carefully cut the unopened burs during early to mid October and keep them in a root cellar or similarly cool place. Once the burs naturally open, you can collect the nuts. Wear heavy rubber gloves when handling the nuts and burs to prevent yourself from getting scratched or pricked.

Store the nuts in a refrigerator or freezer. If you want to use the nuts for culinary purposes, keep them in their shells and store in the refrigerator for one month. You can also keep the nuts in a freezer for roughly six months. Chestnuts have a high starch content and do not store as well or as long as many other nuts. After cooking the chestnuts, you can only store them in the refrigerator for three or four days. If placed in an airtight container and stored in the freezer, however, cooked chestnuts remain edible for up to nine months.

Store the nuts for use as seeds. If you want to treat the nuts as seeds instead of food, you should let them dry in a cool, open space for several days before storing them in a refrigerator. Place the chestnuts in a plastic bag filled with slightly damp sphagnum moss, peat moss, or sawdust. Seal the bag with a twist-tie and store it in your refrigerator.


Comments
0 comment