
Making a Pumpkin Serving Tray
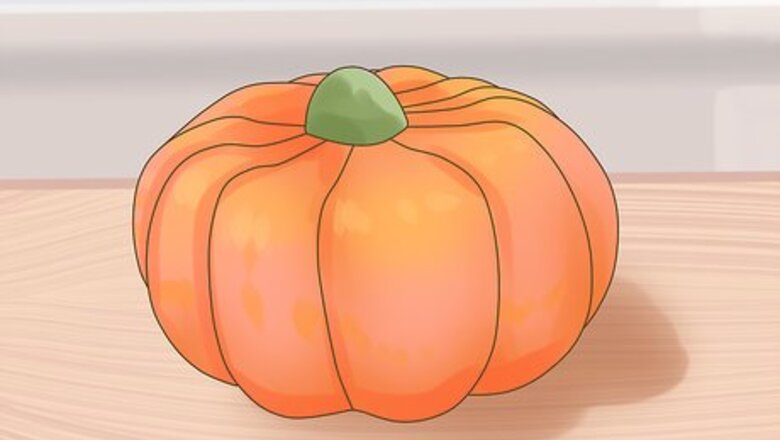
Get a medium-sized plastic or foam pumpkin from the craft store. This will create the base for your serving tray. Choose a pumpkin that is relatively flat on top, and don't worry about the stem.
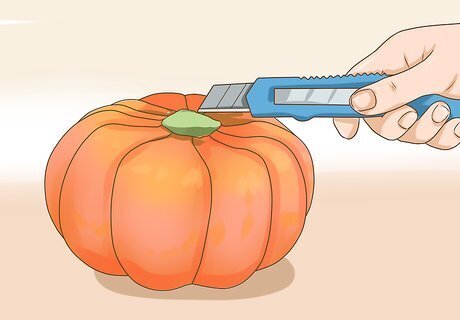
Cut off the stem from the top of the pumpkin. You should be able to do this with a box cutter, craft blade, or even a saw from a pumpkin carving kit. Don't worry about being too neat here; you will be covering the top of the pumpkin. Removing the stem simply helps the serving plate or candle charger sit better on it.
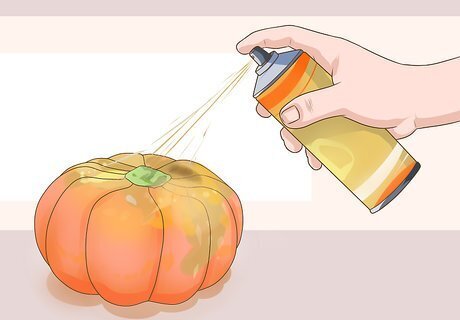
Paint the pumpkin, if desired, then let the paint dry. You can leave the pumpkin as is, or you can paint it a different color using spray paint or acrylic paint. You can also apply a light layer of paint using a wide, dry paintbrush to create a streaked, weathered, vintage look. Gold will work great, but you can paint your pumpkin any color you want. It might be a good idea to match it to your serving tray, however!
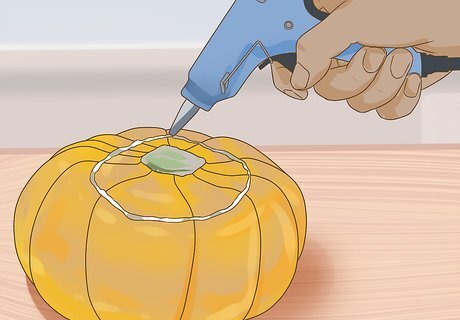
Cover the top of the pumpkin with hot glue. Focus on the highest part of the pumpkin, as this will be the part that touches the tray. Don't worry so much about the dipped or hollow areas, such as the groove around the stem.
Place a round tray on top of the pumpkin. You can also use a large, plastic, candle charger from the craft store instead. Keep the tray proportionate to the pumpkin. You want it to be wider than the pumpkin, but not so wide that it becomes unstable and tips around. Make sure that the tray is centered. Choose a tray or candle charger that goes well with your pumpkin. If the design is nice, but the color clashes, paint the tray with spray paint. Let the paint dry before you use the tray.
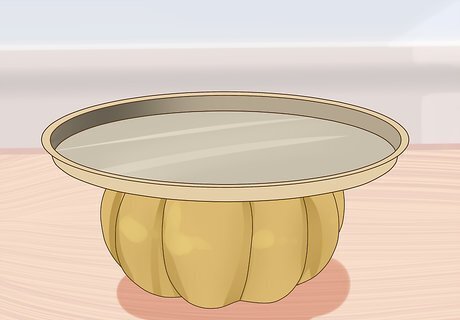
Fill in any gaps between the tray and the pumpkin with more glue. Flip your pumpkin try over and take a look at the seam between the pumpkin and the base of the tray. If you see any gaps, fill them in with hot glue. Alternatively, you can add a line of hole glue along the seam between the pumpkin and the tray to extra stability.
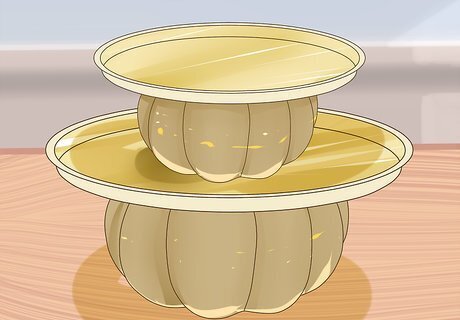
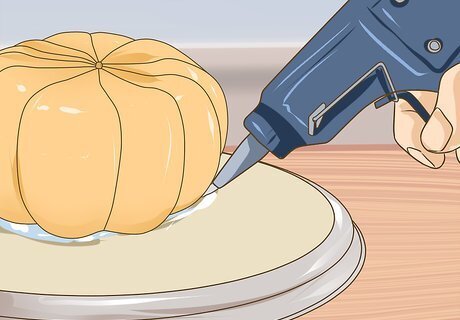
Consider adding a second tier. You can do this by hot gluing a smaller pumpkin and smaller tray on top. You can also do it by hot gluing your medium pumpkin to a large tray, and then gluing the tray to a larger pumpkin. Remember to chop the stems off of the pumpkins, however.
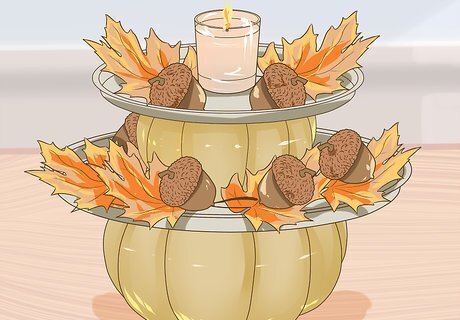
Use the tray. Hot glue only takes a few minutes to set up, so your tray will be ready in no time! To clean it, simply wipe the surface of the tray down with a damp cloth. You can decorate it further by adding some autumn leaves, acorns, and a fall-scented candle on top.
Making a Framed Tray

Get some fake, silk autumn leaves. You can find them in the arts and crafts store. You can use real autumn leaves, but you will have to rinse them, pat them dry, and then press them for 4 to 5 days. Alternatively, you can print out pictures of autumn leaves, cut them out, and use them instead.

Find something to use as a background. You will need something to cover the backing of your picture frame. You can use rustic things, such as linen or burlap fabric. You can also use sheets of scrapbooking paper, but make sure that the design is not too distracting. Consider something simple, such as dark brown or bronze scrolls on top of a cream background, or black calligraphy on top of an ivory background. The background needs to be the same size as the backing of your frame, or a little bit larger. Consider laying two or more different backgrounds to create a collaged effect. Avoid anything with a autumn leaf print, or that is red, orange, or yellow. While these are great fall themes, they will blend in too much with your autumn leaves.
Take apart your frame. Flip the frame over, and undo the hooks on the back. Pull out the backing and the glass. If your frame came with a scrape of paper behind the glass (such as a fake picture), discard it. Choose a simple frame, preferably one that is wider and angled, so that it forms a "tray" when you set it down.
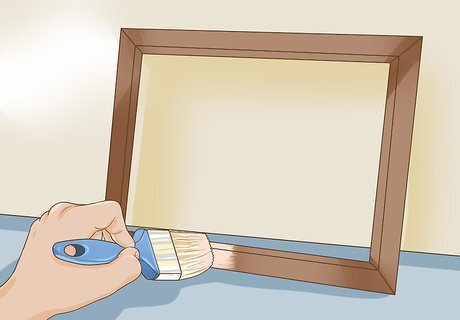
Paint the frame, if desired, and left it dry. You can leave the frame blank, or you can paint it a new color using spray paint or acrylic paint. Choose a neutral color that goes well with the autumn theme, such as gold copper, bronze, brown, ivory, or cream. If you can, you can also try using a dark red or rusty orange. Let the paint dry, then add a second layer, if necessary. Remember to paint the sides and back of the frame as well.
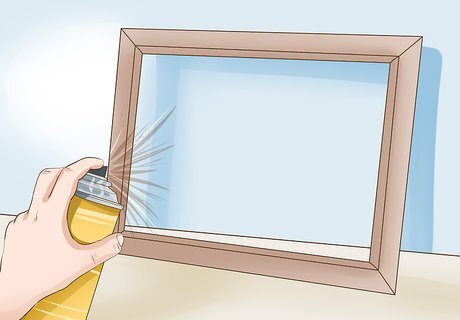
Seal the frame if you painted it. This will help make your paint last longer. Choose a finish that you like best (glossy, satin, or matte), and spray the front, back, and sides. Allow the sealer to dry before applying another coat. If you painted your frame a metallic color, such as gold, be sure to use a glossy sealer. A satin or matte finish will dull down the shimmer.

Paint the backing of the frame with decoupage glue. Take the back part of the frame, and flip it over so that the smooth side is facing you, and the stand is on the back. Apply the glue in a thick, even layer using a paintbrush. You can also make your own decoupage glue by mixing together equal parts of water and white school glue.
Press your background against the glue. Position one side of the background with the edge of the backing, then slowly lower it down, smoothing out any ripples, wrinkles, or bubbles as you go. Don't worry if the backing is too big. You will fix that shortly. #* If you have several different backgrounds, layer them to create a collaged effect.
Glue the leaves to the backing. Brush the back of each leaf with your glue, then press it against the backing. If you want, you can make some of the leaves extend over the edge of the backing; you will trim them off later. You don't have to cover the entire backing with leaves either; experiment with using your positive and negative space. Also, don't be afraid to overlap the leaves.
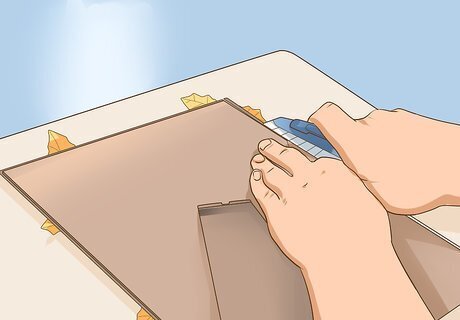
Allow the glue to dry, then use a craft blade to trim off any excess backing and leaf. Once the glue has dried, flip the backing over and place it onto a cutting mat. Run a sharp craft blade along the edges of the backing, cutting away any excess paper and leaves.

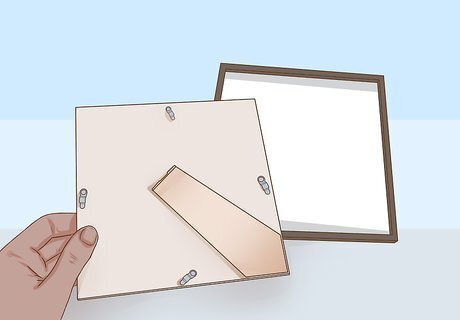
Pry the stand off of the backing if there is one. Most frames will have a stand on the back that folds out so that you can stand the frame up on your table instead of hanging it. Since you are making a tray, you will no longer need this stand. Simply slide an ice pick or a sturdy butter knife under the hinge, and carefully pry it away. If some of the backing tears away, and this bothers you, you can paint over the revealed cardboard with some matching paint.
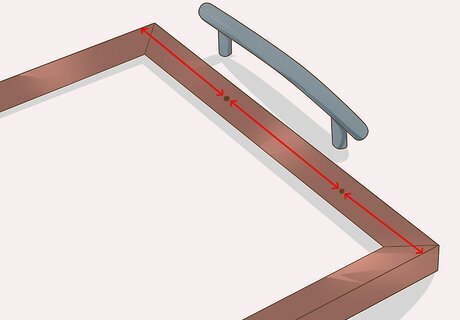
Measure your handles. Choose two cabinet or drawer handles, and place them against the shorter sides of your frame; make sure that the handles are positioned on the top part of the frame, and not the narrow edge. Use a pen or pencil to make a mark where the screw holes are. Choose handles that match the colors on your serving tray. Bronze, gold, or copper go well with warm, fall colors.
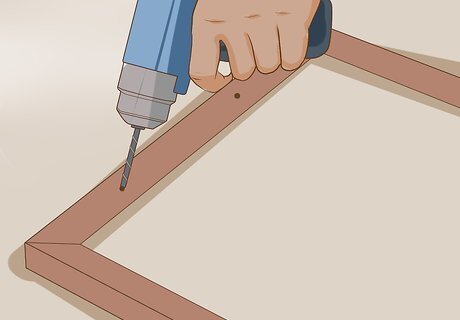
Drill some holes for the screws, then attach the handles. Take the handles away, and drill some holes over the marks you make. Place the handles back on top and insert the screws. Twist the screws into place with your screwdriver. If your frame is very thin, the screws may poke out the back. In this case, consider attaching the handles to the frame using some strong, industrial-strength glue or epoxy.

Reassemble the frame. Flip the frame over so that the back is facing you. Clean the glass with glass cleaner, then carefully insert it into the frame. Place the backing on top, and slide the hooks back into place.
Use the tray. Because this tray is topped with glass, it is very durable and resistant against spills. Despite this, it would not be a good idea to stick the tray into the dishwasher. If it gets dirty, simply wipe the surface clean with a damp cloth.
Making a Pressed Leaf Tray

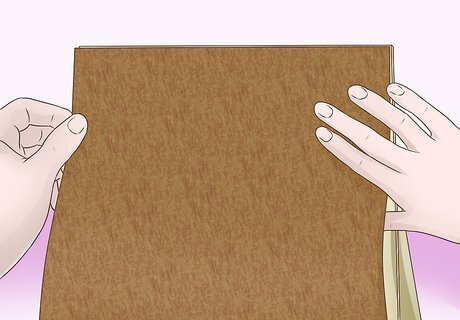
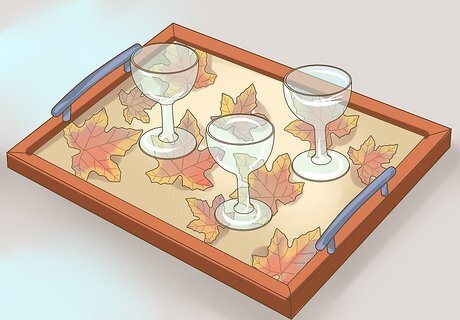
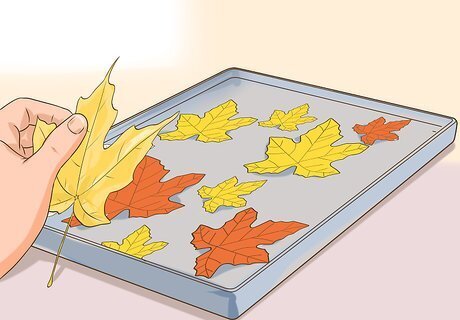
Get some autumn leaves. These can be bright, colorful autumn leaves that you found outside, or they can be silk leaves that you bought from the store. Choose nice leaves, that aren't ripped, torn, dry, or brittle. Also, try to get a variety of colors: red, orange, yellow. Your leaves don't have to be the same type. You can use a combination of maple and oak, for example. How many leaves you use depends on the size of your serving tray and your design. You can cover the tray completely with leaves, or leave some gaps.
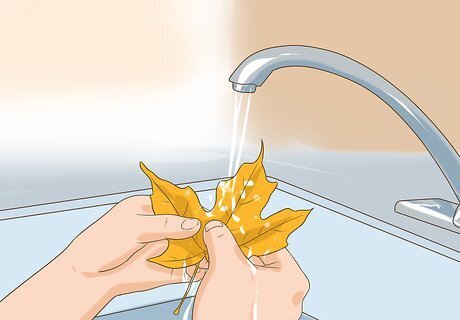
Clean and dry the leaves. Rinse the leaves under cool running water. Gently run your fingers over them to dislodge any dust or dirt. Once the leaves are clean, gently pat them dry between two sheets of paper towel. If you bought the leaves from the store, you do not have to do this.

Press the leaves for 4 to 5 days. Place the leaves between two sheets of paper, then tuck them inside of a book. The paper will help keep the pages of your book clean. Next, place several heavy books on top. If you don't have any, you can use other weights, such as a flower pot, a heavy cooking pot, etc. If you have a flower press, use that instead.
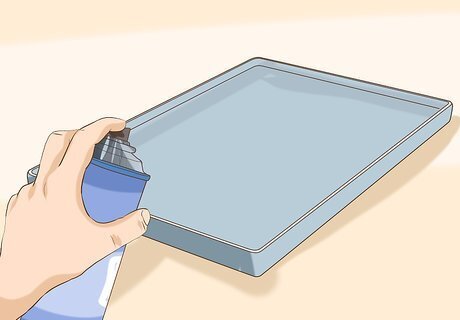
Consider painting your tray with spray paint or acrylic paint. You can leave your tray as it is, or you can paint it to help the leaves stand out better. Copper, gold, bronze, brown, ivory, or cream are all great options. Black may also work if you want something dramatic and elegant, but consider painting the edges of your tray in gold; this will take away some of the harshness. Let the tray dry completely before moving on. If your tray is made out of natural wood, consider leaving it blank, or training it a nice, warm color. Avoid red, orange, and yellow. While these are great autumn colors, they will match the colors of your leaves. As a result, your leaves won't stand out as much.
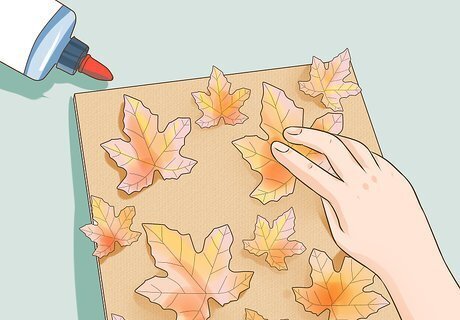
Place the leaves on your tray in a nice design. Move the leaves around until they are where you want them to be. Experiment with overlapping, positive space, and negative space. Keep in mind that you do not have to use all of your leaves. You can trim the stems off or you can leave them on.
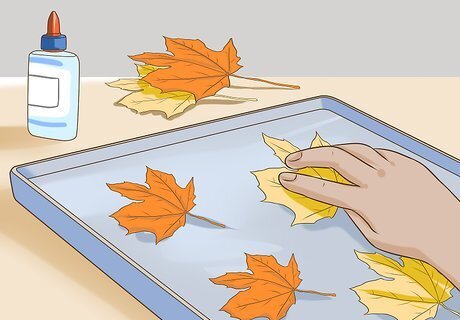
Glue the leaves down. Once you have the leaves where you want them to be, pick them up one by one and glue them down. You can do this by coating the back of each leaf with white school glue and a paint brush. Gently place the leaf back onto the tray, and smooth it down. Make sure to get the glue all the way to the edges to prevent gaps. Go easy on the glue. If you accidentally use too much and it leaks out from under the leaf, wipe it away.
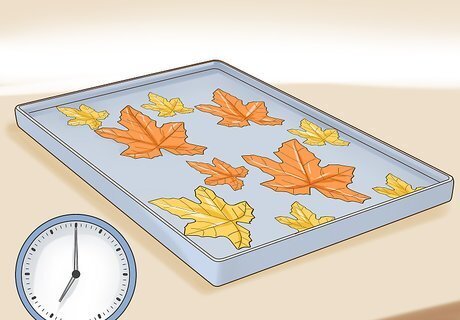
Allow the glue to dry. Your tray is not complete yet, but the glue will help keep the leaves steady during the next step.
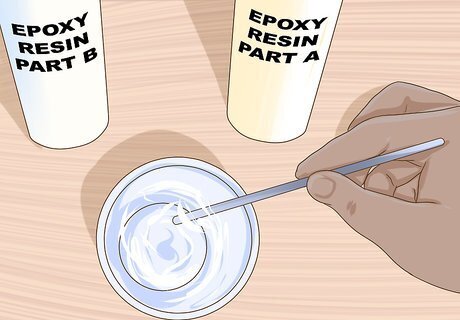
Get some clear epoxy resin, and mix it together following the instructions on the package. You need to get the type of liquid epoxy that you can pour over tables and dries clear; do not get the clay type of epoxy. Each brand will be a little different, but in general, you need to mix together equal amounts of Part A and Part B in a disposable cup. Work in a well-ventilated area. Epoxy can cause some lightheadedness. Work on top of some newspaper or a cheap plastic tablecloth to protect your work surface.
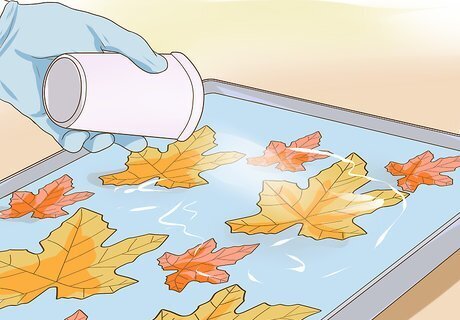
Pour a thin layer of your prepared epoxy onto the tray. Use your stirring stick to help spread it around; be careful so as not to dislodge any of the leaves. You want the epoxy to cover the entire surface of the tray, from edge to edge, corner to corner. Keep the layer thin. Remember, you can always add more later.
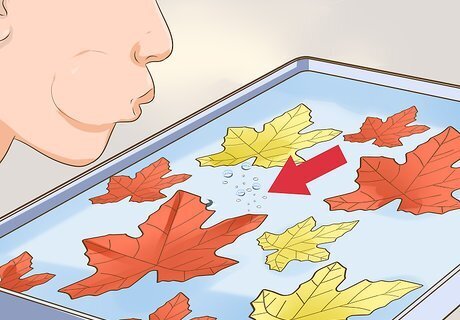
Wait 5 minutes or so, then gently blow on any bubbles that appear. Epoxy sometimes traps bubbles, which don't appear right away. Blowing on these bubbles causes them to pop and go away!
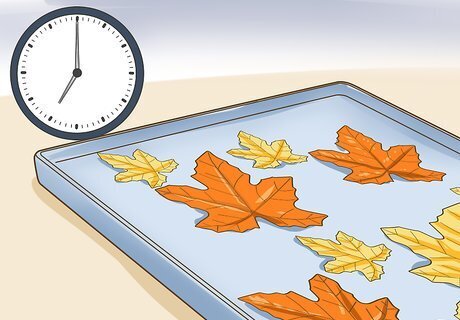
Allow the epoxy to cure. This will typically take a couple of days, but it also depends as to what kind of brand you are using. Refer to the packaging that your epoxy came in for specific curing times. This will typically take a few days. If you home gets dusty, place a box over the tray to keep the dust from getting stuck to the epoxy.
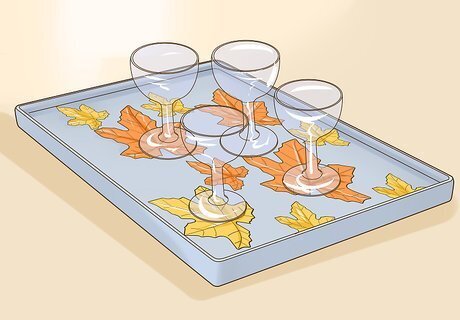
Use the tray. Once the epoxy is fully cured, it is ready to use! Unlike glue and decoupage, epoxy is waterproof. You still want to be careful with it, however. Do not leave it sitting in water, and wipe it down with a damp cloth if it gets wet.


Comments
0 comment