
Using a Basic Knotted Basket

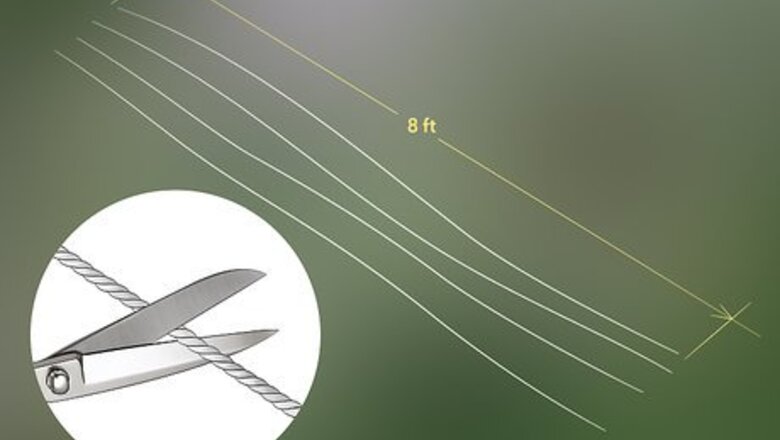
Cut your rope. For this project, you'll need a total of four strands of rope that are each 8 feet (2.44 m) in length. Take your tape measure and scissors and cut these four strands from your cotton rope. Lay out all strands evenly on a flat surface.

Fasten your strands to your metal ring. Take all four strands and thread them through your metal ring so that each strand hangs from the ring at its midpoint. Each strand should hang evenly at both ends. Then: Hold the rope firmly with one hand at the base of the metal ring to gather the strands together. Wrap embroidery floss around the base of loop around the metal ring. Wind the floss tightly around all strands until the windings are about 2" (5 cm) long. Tie off the loose ends with a simple, sturdy knot. You can further strengthen this by adding a layer of transparent glue.
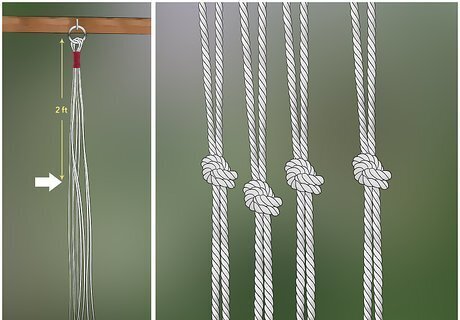
Measure your knots. Hang the ring and attached rope from a hook or other suitable location to make knotting easier on yourself. Measure 2 feet (.61 m) down from the hook and gather two neighboring strands together. Tie these together using an overhand knot. The overhand knot is relatively simple. Form a loop with your two strands of rope and feed the loose ends of the strands through the loop. Pull the ends tight, and the knot is tied. Continue tying knots to connect neighboring strands at 2 feet (.61 m) below your metal ring. In total, there should be four knots.

Tie a second row of knots. Below each knot should hang two stands. Take one strand apiece from neighboring knots, and tie these together in the same fashion as before with an overhand knot at 6" (15.24 cm) below your first row of knots. The base of your pot will rest in the knotted portion of your rope. If it looks like the planter may not fit, untie your knots and increase the space between the two rows.

Secure the bottom of your rope. Three inches (7.62 cm) below your second row of knots, gather all strands of your rope together firmly in one hand. In the same fashion you fastened the top of the rope at the base of the metal ring, you're going to close off the bottom of your hanging rope basket. Begin wrapping your embroidery floss around all strands at 3" (7.62 cm) below your second row of knots. Wrap the floss so there is no space between windings and the strands are held together firmly. Tie off the end of your floss when your windings are about 2" (5 cm) in length. You can strengthen the hold of your floss by applying a suitable transparent glue.

Trim away excess rope and enjoy. Unless you had to significantly adjust the distance between rows of knots to better accommodate a large planter, you should have some extra rope at the bottom of your planter. This can be cut away with your scissors.
Creating Planter Tiers with Knotted Rope
Prepare your work area. This project will require you to cut holes out of your board, so you should lay a drop cloth or covering in your work area to catch sawdust. Additionally, a clear, unobstructed work area will prevent you from tripping and accidentally injuring yourself. Make sure your work surface is sturdy, clean, and level. This kind of work surface will be safest and easiest to work on.

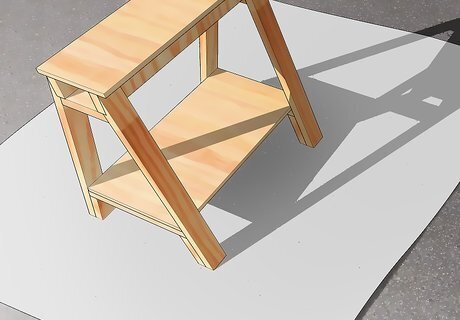
Mark the dimensions of your wood. Take a pot and place it topside down onto your wood. Use a writing utensil to outline the mouth of the pot onto the wood. Then take your tape measure and mark the wood 1 - 2" (2.54 - 5 cm) outside the top, bottom, left, and right sides of the circle. These marks form the outer edge of one tier. Thicker spacing between the outline of the mouth of the pot and the edges of each tier will create a sturdier hanging planter. Repeat this procedure to mark out more tiers in your wood. Avoid adding more than three tiers of moderately sized plants. More than three tiers may make your planter too heavy. The spacing between the outline of the mouth of the pot and the outer edge of each tier should be the same for all tiers.

Cut tiers from your wood. For better accuracy, you may want to use a straight edge to extend horizontal lines through your top and bottom marks and vertical lines through the left and right ones to complete each square tier outline. Take your saw and cut each tier at its outer boundary marks to create equal sized, square wooden tiers. Depending on the size and weight of your wood, it may be a good idea to clamp it to your work surface before cutting. If you are using an automated saw, like a reciprocating saw, be sure to wear proper safety equipment, like protective eye wear, a dust mask, and gloves. After sawing, your wood may be rough where you've cut. Rub medium grit (60 - 100) sandpaper with moderate pressure to smooth rough spots and burrs.

Mark the holes for your pots. If the tier hole for your pot is too big, the pot will fall through, and if the hole is too small, the pot will be unbalanced and top-heavy. Measure and draw a second circle ¼" (.64 cm) inside the outline of the mouth of the pot. You may find it easiest to dry this circle by: Tying a writing utensil to one end of a length of string. Attach the string with a tack at the center of the outline of the mouth of the pot. Pulling the pencil to make the line taut. Measure the distance between the pencil and outline of the mouth of the pot. Shorten the string until the pencil, when held taut, is ¼" (.64 cm) inside the outline. Keep the string taut as you draw on the wood to form your second circle, and repeat this process for all tiers.
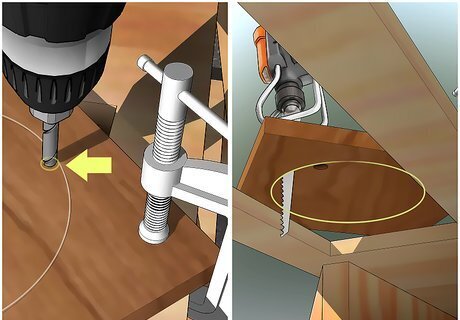
Cut the inner holes free of the wood. Clamp your wood so that the inner hole is positioned with nothing beneath it. Failing to do this will likely result in unnecessary cuts on your work surface. Then use your saw to cut the inner circle along the line you have marked until it comes free. Cutting from the edges will compromise the stability of your tiers. Instead, use your drill and boring bit to create a starting point for your saw at the center of your inner circle.
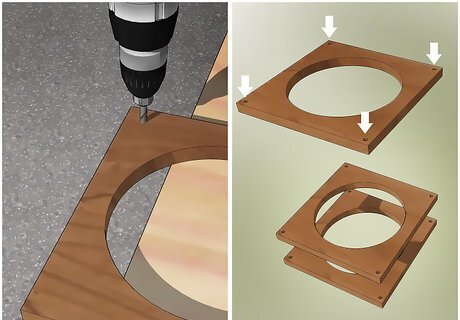
Drill your rope holes. Measure and mark four points on each tier, with one point in each corner. These marks should be ½" (1.27 cm) from both edges of each corner. Then, use your drill and boring bit to drill holes at these points. Be extra careful when measuring and marking your rope holes. If these are inconsistent, your planter may hang crookedly.

Plan the distance between tiers. The distance between your tiers will depend on the size of the plants you'll be putting in the pots. Taller plants will require more vertical space between tiers. In many cases, 1 foot (30.5 m) will be more than enough space separating tiers. Once you've decided the distance between tiers, you can estimate the amount of rope you'll need. Including the distance between tiers, you'll also need 1 foot (30.5 cm) of extra line to fasten the rope at the top. It's much easier to cut free extra rope than splice in more. For this reason, you may want to add a little length to your rope estimate.

Attach the rope to your ring. Cut four stands from your rope, each one the same size. The length of your rope will be determined by your estimate, but in most cases, 30" (.76 m) should be sufficient for a two-tier hanging planter. To fasten your rope: Align all ends so they are collected together evenly. Thread one end of the strands through your metal ring, then tie it to the ring in an overhand knot. Strengthen your knot by applying a suitable, transparent glue to it. Cover the knot thoroughly in a thin layer of glue, then allow it to dry completely.

Hang your tiered potted plants. Separate your strands of rope and feed one strand through each corner hole in your first wooden tier. Measure out the distance you planned, then tie a thick overhand knot below each corner hole. Repeat this for each tier. Once the knots have been tied beneath your final tier, your tiered hanging basket is complete. Hang the planter, insert pots into the center holes in each tier, and enjoy your handiwork.
Adding Personal Touches

Thread wooden accents and beads on your rope. The simple addition of wooden beads above the knotted portions of your rope can give your hanging planter a polished, professional look. Glass beads are also a great option, as these will catch the light and sparkle. In many cases, a hook or pin can hung from excess rope below your hanging planter to fasten other ornaments and knickknacks as well.
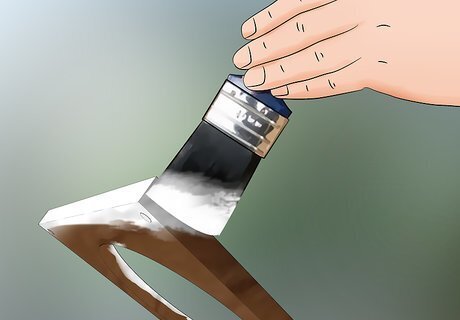
Apply paint to hanging planters. You may want to paint your planter so its coloring matches your home decor. For most kinds of rope, acrylic pant can be applied directly to it directly to change its color. If you want to paint your wooden tiers, you'll have best results if you sand, clean, prime, and paint the tiers in that order.

Braid and weave excess rope to create unique designs. Surplus rope at the bottom of your planter doesn't have to be cut away. You can turn this into an interesting design with a simple braid or weave. Give your braid or weave character by inserting beads, coins, and other accents.


Comments
0 comment