
Disabling Avira Real-Time Protection on Windows

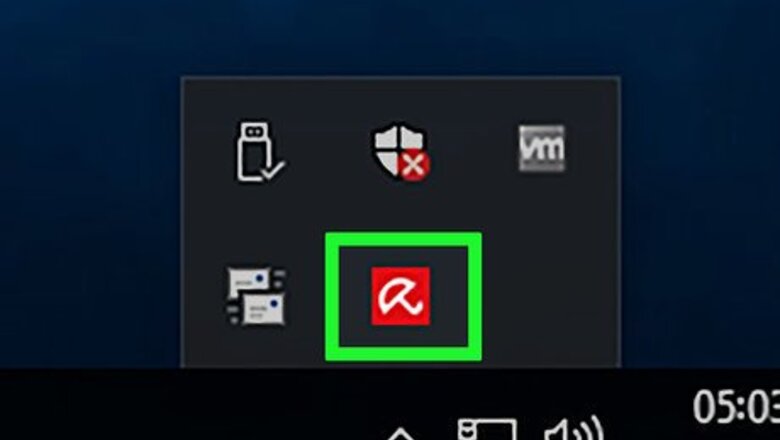
Right-click on the Avira icon in the system tray. It’s a red icon with an outline of a white umbrella. You’ll usually find it to the left of the clock. If you don’t see this icon, click the upward-pointing arrow next to the system tray to see hidden icons.

Click Manage Antivirus.

Click Real Time Protection.

Slide the “Real Time Protection” switch to Off Windows Switch Off. The knob will slide to the left and turn red. You may have to click Yes to allow Avira to make changes to your computer if prompted.

Click Status. It’s the icon of a shield with a check mark on the right side of the window.

Click Firewall. It’s the icon with a shield in a brick wall.

Slide the “Firewall” switch to Off Windows Switch Off. The knob will slide to the left and turn red. This disables Avira on Windows. You may have to click Yes to allow Avira to make changes to your computer if prompted.
Uninstalling Avira on Windows

Open your Windows Settings. Click the Windows Start menu, then click Settings Windows Settings.

Click Apps.

Click Apps & Features. You can also quickly open this menu by just searching for it in the Windows search bar.

Select Avira Antivirus from the list of apps.

Click Uninstall. A confirmation message will appear.

Click Uninstall to confirm. A security message will appear.

Click Yes. You may have to click Yes again if you see a second pop-up message. This will uninstall the antivirus program. When it’s finished you’ll be prompted to restart the computer.

Click Yes to restart the PC. Once the computer has rebooted, Avira will no longer be installed. Repeat this process for the other Avira apps, such as Phantom VPN, Safe Shopping, Avira Software Updater, and System Speedup.
Disabling Avira Real-Time Protection on Mac

Click the Avira icon in the menu bar. It’s the red icon with a white umbrella inside. The Avira menu will expand.

Click Open Avira. It’s at the bottom of the menu. This opens Avira.

Click the switches icon in the left-column. It’s the icon that looks like two switches under the radar icon in the left panel.

Slide the “Real-Time Protection” switch to Off iPhone Switch Off Icon. The knob of the switch will move to the left and turn gray. You may have to enter your admin password to continue.

Slide the “Protection Cloud” switch to Off iPhone Switch Off Icon. The knob of the switch will move to the left and turn gray. You may have to enter your admin password to continue.

Slide the “Firewall” switch to Off iPhone Switch Off Icon. The knob of the switch will move to the left and turn gray. Avira is now disabled on your Mac. You may have to enter your admin password to confirm the change.
Uninstalling Avira on Mac

Open Finder Mac Finder. It’s the first icon in the Dock, which you’ll usually find at the bottom of the screen.

Click the Go menu. It’s in the menu bar at the top of the screen.

Click Utilities. It’s near the bottom of the menu.

Double-click Avira-Uninstall. It’s the red icon with the white outline of an umbrella on it and an “X” in the corner.

Click Uninstall. This launches the uninstallation wizard.

Enter your administrator password when prompted.

Click OK.

Click Done. Avira is no longer installed on your Mac.


Comments
0 comment