
Installing the Active Directory Domain Services Server Role
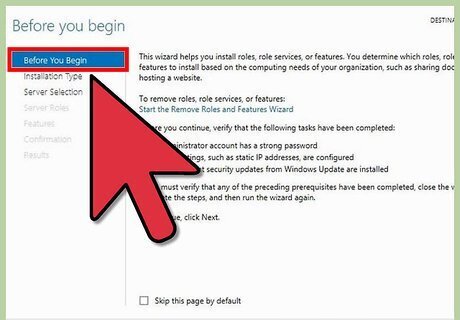
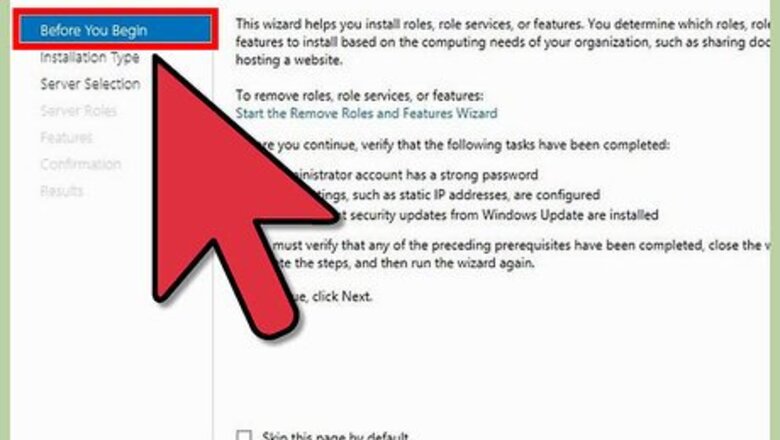
Add Roles and Features. Boot your Windows 2012 R2 server, if it is not running. Log on to the server when it completes booting. Notice that Server Manager is displayed upon a successful login when using an administrator account at the initial logon prompt. Click Add Roles and Features to display the Add Roles and Features Wizard. This wizard helps you easily manage roles, role services, and features. Verify you have completed the requirements for the role to be installed. Click Next to display Select Installation Type.
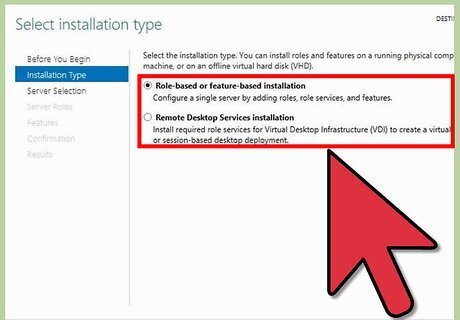
Review Select Installation Type options. Note that this is a role-based and feature-based installation. Click Next to display Select destination server.
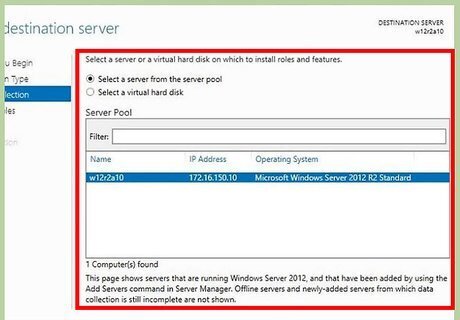
Choose a Destination Server. Note that this selection lets you select the server on which you want to do the installation. In this example there is only one server, so there is only one option. Click Next to display the Server Role and Feature Wizard so you can make a server role selection.
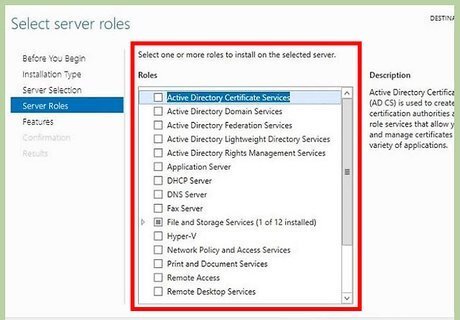
Select roles. Note that you can highlight a name in the center pane so that you can read the description in the right pane. Click the checkbox next to Active Directory Domain Service. Click Next to display Add Roles and Features.
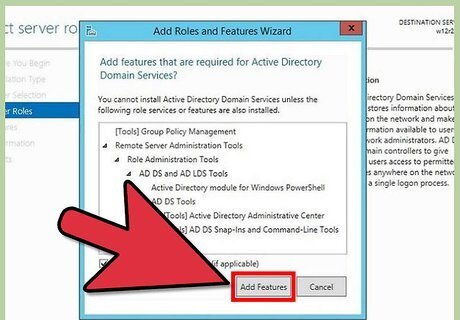
Select features. Observe the popup informing you that in order for Active Directory Domain Service to be installed, additional features, not already on the machine, need to be installed. Click Add Features, the popup disappears, and you are shown the Active Directory Domain Service checkbox checked. Click Next to display a list of features that you can add. Note that in this step no additional selections are needed. Click Next to display a screen that gives an overview of Active Directory Domain Service. Click Next to display the Confirmation installation selections.
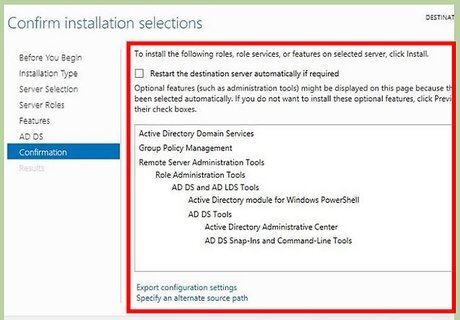
Review the Confirmation installation selections. Use the confirmation window to review your choices, then hit continue to accept the selection. Click install. Keep all windows open. Move on to creating your domain, and keep learning.
Create the Domain
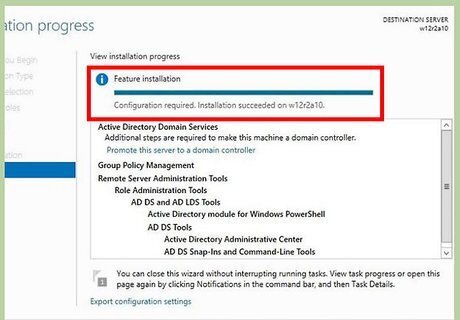
Verify Active Directory Domain Service is installed. Take note of the blue progress bar, and beneath it, you are reminded that Additional steps are required to make this machine a domain controller. Move your mouse and hover over the blue progress bar to see when installation is 100% complete.

Promote server. Observe that at this point, only the Active Directory Domain Service is installed. In other words, the server is not yet a domain controller. Note the link, in blue, Promote this server to a domain controller. Click Promote this server to a domain controller to display the Active Directory Domain Services Configuration Wizard. Notice under Select the deployment operation are three radio buttons; please review them, because they are very different. Click Add a new forest. Type your desired domain name under Specify the domain information for this operation, and to the right of Root domain name. Click Next to display Active Directory Domain Services Wizard.
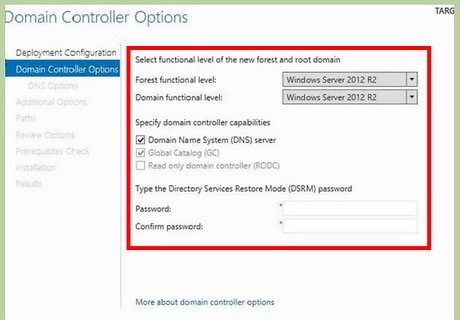
Configure domain controller options. Notice that these are options, which means you are not required to install any. Notice that even though DNS is selected you can un-check it, since it is optional, but that is possible only if you have another DNS server in your domain. Since a DNS server does not exist yet in your domain you must leave it checked. Click the box under Type the Directory Service Restore Mode (DSRM) password. Type the restore password you desire. Don't forget it! Click Next to display DNS options.
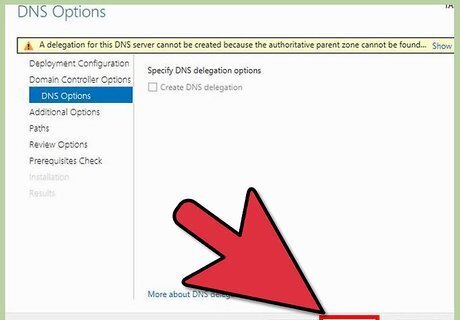
Configure name service options. Notice that the message in the yellow box is informing you that a domain could not be found with which to associate; the reason is because your domain is the first domain in the forest. Click Next to display additional name options. Notice that the wizard lets you select more options. Click Next to display Active Directory configuration settings.
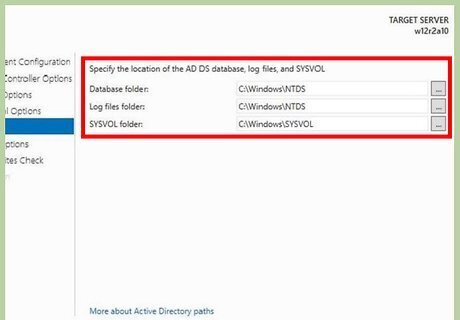
Configure the path name. Notice the default location for saving active directory files, which you can accept or modify where Active Directory configuration will be stored. Click Next to accept the default location and display the options you have selected.
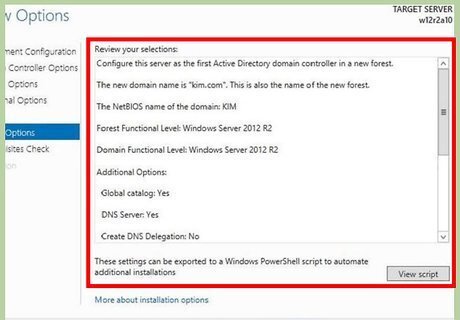
Review the selection. Review the selected options. Click Next to begin the installation prerequisite check.

Install the selection. Observe the green circle and the white check mark. Click Install to begin installing the options you have selected. Note that at this point the installation process goes through several displays, including reboot followed by the sign in prompt. Keep all windows open. Continue to Part 3, and keep learning.
Executing the Domain Log-on Process
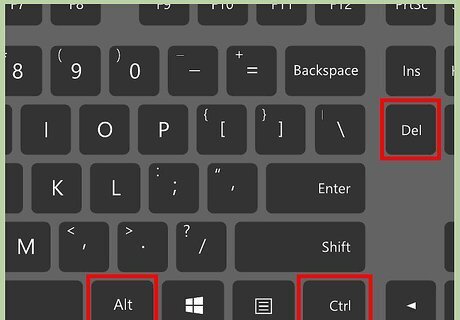
Execute Ctrl+Alt+Delete Notice that the sign in prompt is an indication that the installation is complete. Issue Ctrl+Alt+Delete to display yourdomainnamehere\Administrator, which is requesting the Administrator password.
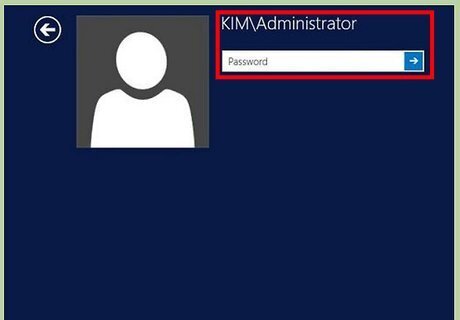
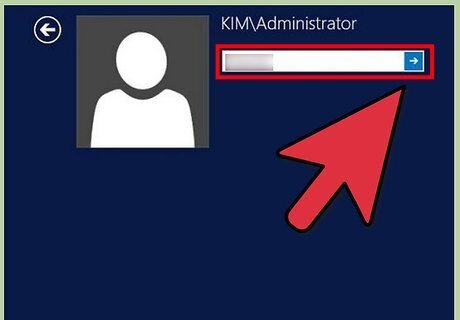
Log on to the domain. Notice that you are about to logon to the domain, and not the server, and that only the account Administrator can logon using the domain controller console logon prompt. Observe that this prompt means you are logging on to your domain using the user account Administrator and its password. Type the password for Administrator and click the arrow to display Server Manager, if logon is successful. Continue to Part 4, Create domain memberships, and keep learning.
Creating Domain Memberships
Verify connectivity. Take note that in this example you will configure membership using Windows 7, but you can use any other Windows machine. Boot a Windows 7 machine, if it is not up. Logon. Verify that your Windows 7 machine and your Windows 2012 R2 server can ping each other by IP address.
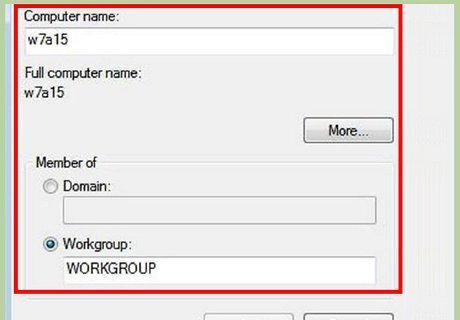
Join your Windows 7 computer to the domain. Go to Control Panel on your Windows 7 computer. Click System to display basic information about your computer. Click Advanced system settings to display System Properties. Click Computer Name. Click Change to display Computer Name/Domain Changes. Click the radio button next to Domain, Under Member of. Type yourdomainnamehere. (Ex. kim.local) Click OK to display User name and Password prompt; note that this is the administrator account on the domain controller. Note that Administrator is the only account that has authorization to add a computer to the domain. Type Administrator into the username field and use the password you've created. Click OK. Note that shortly after you will see a popup welcoming you to your domain. Click OK and you are prompted to restart the client.
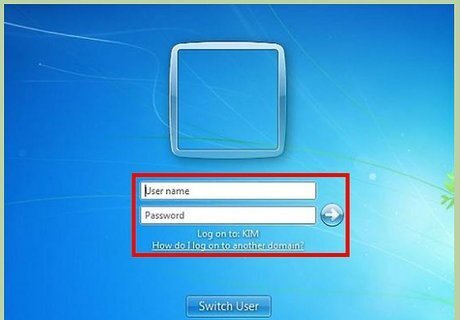
Logon the domain. Click OK to return to System Properties. Click Close and you are prompted to Restart Now or Restart Later Click Restart Now to restart the client. Issue Ctrl+Alt+Delete, after the restart, to display the logon prompt. Notice that you can logon to the local computer with your normal Windows 7 user account. However, if that same account tries to logon to the domain, it will fail, for two reasons: Because so far only one domain user, Administrator, has been configured. Your Windows 7 local users is not a member of your domain. Click Switch User to display Select a user for logon, so you can logon as Administrator. Click Other User to display the domain logon prompt. Notice that under Password, Logon to: yourdomainnamehere displays; informing you that you are about to logon with a domain logon and not a local logon. Type Administrator into the username field and use the password you've created. You are now logged on to the domain, not your local Windows 7 computer.


Comments
0 comment