
Prepping Your Hat Making Station

Choose a flat surface. As you begin folding the newspaper, you will want to make your creases crisp and clean. Making a paper hat on a non-flat surface or in the air will lead to a messier hat.

Get a half sheet of newspaper. The size will vary based on the print size of the newspaper you are using. Many are around 15x22.

Find some tape. This is optional as most newspaper hat designs use folds to hold the hat together. If you are in a rush, or just want to make the hat extra sturdy, use tape when necessary.

Gather possible accessories. When you are done with your hat, you can decorate it any way you want. Paint it. Color it with markers. Put stickers on it. Use feathers to give it added flair. Be as creative as you want. If you are making these hats for a birthday party, you could easily set up a fun arts and crafts station for them. Write each child’s name on their hat in big colorful letters. Let them color their names in and personalize their hat however they want.
Fashioning Your Paper Cone Hat

Place a piece of paper on your table. This is the easiest newspaper hat design of all.

Take the top right corner of the paper and bring it across to the left hand side. You can either fold the paper or not. If you fold there will be a crease in your hat and won’t have that perfect conical shape.
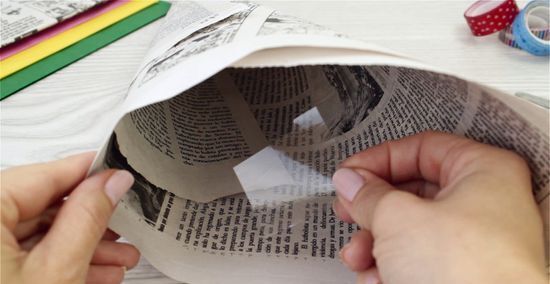
Tape the inside of the cone you’ve just created. A single piece of tape at the edge of the cone will suffice, but you can choose to take the entire part where the two edges meet.

Cut the excess paper. After taping the edges together, you’ll have a triangle piece left over. Cut it off.

Decorate to fit your theme. Try adding tassels, string, or lace at the top of the hat to give it a truly princess feel. If you'd rather turn it into a witch or wizard hat just cut a piece of cardboard into a circle. Cut a smaller circle out of the bottom and slide over the cone hat. Cut to size. Or if you want to build a birthday cone hat, add cotton balls to the top. Color in the sides with bright colors . Make a trim out of construction paper. Cut a long strip that can reach around the base of the hat. Make small cuts all along the side to add texture. Then paste to the base.
Making Your Paper Pirate Hat

Get a piece of newspaper. Place it in front of you with the short side facing you.

Fold the paper vertically. Take the top of the paper and fold towards you creating two equal halves. Many art teachers describe this fold as a “hamburger” fold because it is the shape of a hamburger after you fold it.

Fold it again horizontally. Bring the right corner of the paper over to the left corner. Then crease the fold. Make sure that you create a clean crease. This creased line will be very important in your next step.

Unfold the fold you’ve just created. There should be a crease down the center from folding it horizontally and then unfolding.

Fold the top corners to the center line. Take the right corner and fold it over making sure that the edge of the paper follows the crease you’ve just created. Now do the same with the left corner. Fold it over making sure that the edge of the paper follows the crease you’ve just created. Make sure to keep them even.
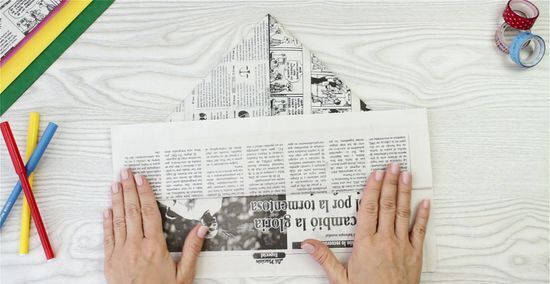
Fold one bottom flap up.

Flip to the other side and fold the other bottom flap up. If you want to size the hat to fit a smaller or bigger head, fold both sides of the hat in by an inch or so (depending on the size you want), before you fold up the bottom flap.

Open up the bottom. Now you have your hat. Wear it however you like. Place it with the flat side forward for a pirate look. Place it with the flat side to the side of your head and you have a deli dinner hat. If you want to make your hat more secure, you can tape the two sides you just folded up.
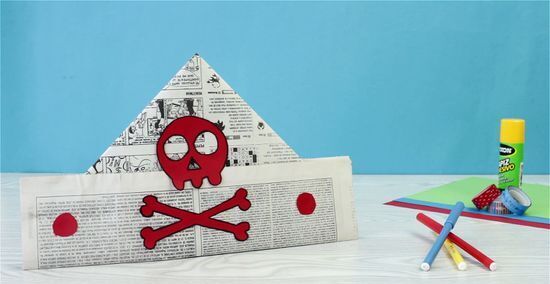
Add fun decorations. Use feathers, scrap paper, markers, or any other arts and crafts materials you might have at home.
Creating Your Paper Bishop Hat

Place a half sheet of newspaper on your table. Place it so the short side is facing you.

Fold your paper in half. Take the top right corner and fold in half. Make sure to create a nice crease in the paper.

Unfold your paper. Now place your paper with the long side facing you. You should have a nice creased line down the center of your page.

Fold the corners to the center crease. Take the right corner and fold it over making sure that the edge of the paper follows the crease you’ve just created. Now do the same with the left corner. Fold it over making sure that the edge of the paper follows the crease you’ve just created. Make sure to keep them even.

Fold the one of the remaining one bottom flap up.

Flip the paper over and fold up the other flap. Now you should only see a big triangle.

Fold in half. Make sure that the single point is at the top before you fold it in half. Take the bottom right side and fold over to the left. Make a clean crease in the middle.

Unfold back to the previous position. Now you should have a crease running vertically in the center of your newspaper.

Take both bottom corners and fold to the center aligning it with the crease.

Tape the two corners together.

Open up the bottom. Now you have your hat. Decorate accordingly. Try coloring the different parts of the hat with paint, markers, or crayons. Paste fabrics on the side.


Comments
0 comment