
X
Expert Source
Aaron BethAppliance Technician
Expert Interview. 14 July 2020.
Luckily, cleaning your fridge coils only takes about 15 minutes and it’s so easy to do! Keep reading, and we’ll walk you through where to find and clean the coils so your refrigerator keeps running smoothly.
- Unplug your fridge from the wall. Access the coils behind the front kick panel if your fridge has one, or on the back of the appliance.
- Alternate between vacuuming the coils with a narrow hose attachment and scrubbing them with a condenser coil brush to remove dust.
- Replace the kick panel or push your fridge back into its original position. Finally, plug your fridge back in.
Accessing the Coils

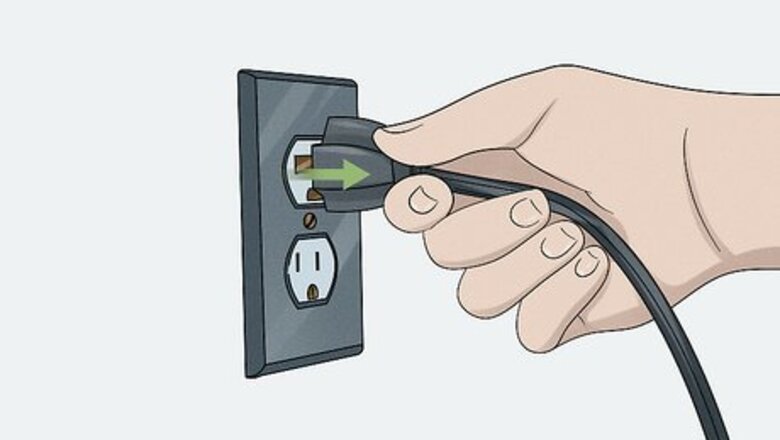
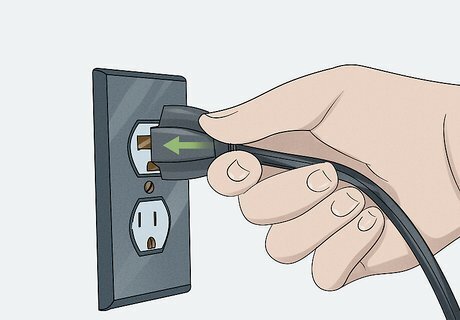
Unplug your fridge from the wall. If your fridge has a power switch, set it to the “Off” position, and then pull the power cord out from the wall. Don’t worry about your food getting warm since cleaning condenser coils only takes a few minutes and your fridge will stay cold for up to 4 hours. Always turn off electrical appliances before cleaning them to protect yourself from getting shocked or electrocuted.
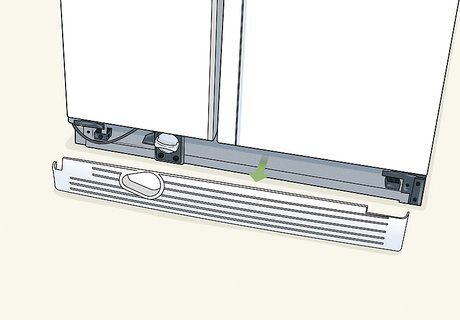
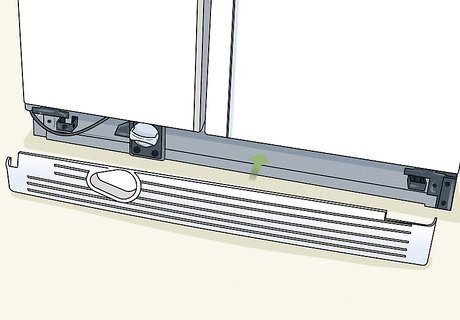
Unclamp the kick panel on the bottom of the fridge to access the coils. Many modern fridges have their coils hidden behind a panel underneath your fridge’s door. Try lifting the panel up slightly and pulling it toward you to unclip it from your fridge. If the panel has screws, unscrew them with a screwdriver. Set the panel somewhere safe on the floor or a table while you clean the coils. If your fridge doesn’t have a bottom panel underneath the door, then the condenser coils are located on the back.

Pull your fridge away from the wall to access the coils if they're on the back. Older refrigerators tend to have their coils located behind a panel on the back of the fridge. Slowly pull the fridge forward until you have enough space to access the panel on the back of the machine. Unscrew the panel with a screwdriver to reach your refrigerator’s condenser coils. Ask a friend to help you pull your fridge away from the wall if you’re having trouble moving it on your own. Lay a folded towel out in front of your fridge to protect your flooring from marks or scuffs. If your refrigerator has a water dispenser, be careful not to pull it so far out that the water supply hose disconnects from the fridge.
Vacuuming and Dusting the Coils
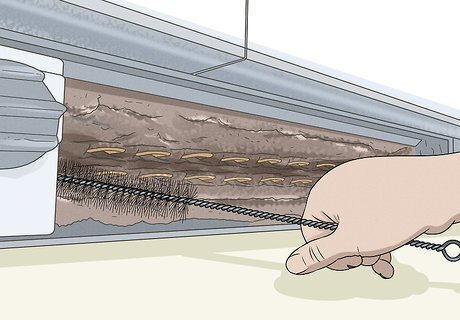
Vacuum the dust off the coils with a narrow hose attachment. Connect the hose attachment with the narrowest nozzle to the end of your vacuum. Slowly move the nozzle back and forth over the coils to remove the largest dust bunnies that are trapped inside. If the nozzle fits between the coils, vacuum there as well. Take the opportunity to vacuum the area behind and underneath your fridge while it is pulled out from the wall. Avoid forcing the vacuum nozzle between the condenser coils if it doesn’t fit since you could damage them.
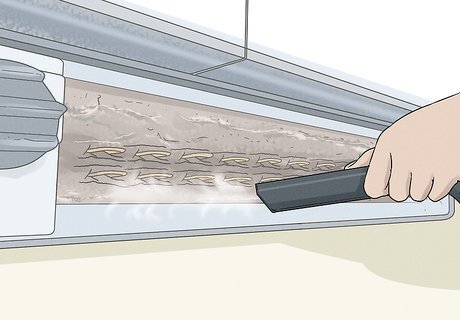
Scrape stuck-on dirt with a condenser coil brush. A condenser coil brush is long and narrow to fit between the coils and scrub off all the grime. Push the brush bristles between the coils, and move it back and forth to get rid of as much dust as you can. Move the brush around the outsides of the coils as well to get rid of the large clumps of dirt. If you’re having trouble seeing the coils, use a flashlight to help you see more clearly.

Alternate between vacuuming and brushing the coils until they’re clean. Now that you’ve loosened up more dust and dirt from the coils, run your vacuum over them again. Don’t forget to vacuum the dust bunnies stuck in the brush bristles as well. After running your vacuum, gently scrub the coils with your brush again to loosen up more dirt. Once you remove all the debris from the coils, you’re finished cleaning them. Keep your vacuum running and put the nozzle underneath the coils while you’re brushing them. That way, some of the dust will get sucked up as soon as you brush it.
Finishing the Job
Place the bottom panel back onto the fridge if you took it off. Hold the bottom panel up to your fridge in its original position and push it back in until it snaps into place. If the panel had screws, use your screwdriver to tighten them back onto your fridge. If you had to remove a back panel to access the coils, be sure to reattach it as well. Before you reattach the panels, clean the fridge’s drip pan, which is a tray that collects water. Pull the pan out, empty the water, and wipe it with an all-purpose cleaner.
Push your fridge back against the wall and plug it in. If you had to pull your fridge out, slowly slide it back into its regular position. Once your fridge is back in place, plug it back into the outlet and turn on the power switch if your refrigerator has one. If the coils are on the back of your fridge, leave a 1 in (2.5 cm) gap between the coils and the wall. This helps air circulate around the coils and keep them operating efficiently.

Clean the coils at least twice a year. Check your fridge coils every 6 months to clean up any dust and dirt that has built up. If you have pets, try to clean the condenser coils every 2–3 months since pet fur can get caught in them and make them work less efficiently. Consider setting a recurring reminder on your phone so you remember when it’s time to clean your fridge coils.


Comments
0 comment